

Is your generator refusing to start because of a broken starter rope? You’re not alone.
Many people face this frustrating issue, but the good news is that fixing it is easier than you might think. With just a few simple tools and some guidance, you can get your generator up and running in no time.
Imagine the relief of having your generator ready for your next outdoor adventure or power outage. We’ll walk you through each step of the repair process. You’ll learn how to identify the problem, gather the necessary materials, and execute the fix like a pro. By the end, you’ll not only have a functioning generator but also the confidence to tackle similar repairs in the future. Let’s dive in and get your generator back to work!

Credit: www.hipastore.com
Diagnosing Starter Rope Issues
Diagnosing starter rope issues is important for smooth operation. A faulty starter rope can prevent your generator from starting. Knowing how to spot these problems helps you fix them quickly.
Check For Fraying Or Damage
Start by inspecting the starter rope. Look for any signs of fraying or cuts. Damaged ropes can break easily. Replace a frayed rope to avoid starting problems.
Test The Pull Mechanism
Next, check the pull mechanism. Pull the starter rope slowly. It should move smoothly without resistance. If it feels stuck, dirt or debris may be blocking it.
Inspect The Recoil Spring
The recoil spring is vital for rewinding the rope. Check if it is intact and functioning. A broken spring will not rewind the rope properly. Replace the spring if needed.
Look For Blockages
Clear any debris around the starter housing. Dirt can block the mechanism, causing issues. Make sure the area is clean and free from obstructions.
Test The Starter Handle
Examine the starter handle for cracks or breakage. A damaged handle can make pulling the rope difficult. Replace it to ensure a firm grip.
Listen For Unusual Noises
Pay attention to any strange noises while pulling the rope. Grinding or clicking sounds can indicate deeper issues. Investigate these noises further for potential problems.
Consult The Manual
Your generator’s manual is a helpful resource. It offers specific instructions for diagnosing issues. Follow the guidelines for your model to identify problems.
Safety Precautions To Follow
Fixing a generator starter rope can be simple. Safety should always come first. Taking precautions helps prevent injuries. Follow these steps to stay safe while you work.
Wear Protective Gear
Always wear gloves. They protect your hands from cuts. Safety goggles shield your eyes from debris. Use sturdy shoes to protect your feet.
Work In A Well-lit Area
Choose a bright space for your repairs. Good lighting helps you see small parts clearly. It reduces the chance of mistakes. A clean area also keeps you safe.
Disconnect The Generator
Always turn off the generator. Disconnect it from any power source. This step prevents accidental starts. It also reduces the risk of electric shock.
Check For Fuel Leaks
Inspect the generator for fuel leaks. Fuel can be dangerous. If you smell gas, do not start work. Fix leaks before continuing.
Keep Tools Organized
Use a toolbox to store your tools. An organized space helps you find what you need. It prevents accidents caused by misplaced tools.
Follow Manufacturer Instructions
Read the user manual before starting. It contains important safety information. Following these guidelines helps you avoid mistakes.
Ask For Help
If unsure, ask someone for help. Working with a partner can be safer. They can assist you and provide support.
Tools You Will Need
Fixing a generator starter rope may seem daunting, but having the right tools makes the task much easier. Using the correct equipment can save you time and frustration. Let’s look at the essential tools you’ll need to get started.
Basic Hand Tools
- Screwdrivers:A set of flathead and Phillips screwdrivers is essential for removing covers and securing components.
- Wrenches:Adjustable wrenches or socket sets help loosen and tighten bolts effectively.
- Pliers:Needle-nose pliers can assist in gripping small parts and managing tight spaces.
Replacement Parts
- Starter Rope:Make sure to have a durable starter rope that matches your generator’s specifications.
- Handle:A comfortable handle ensures a good grip when starting the generator.
- Spring:If the recoil mechanism is damaged, a new spring may be necessary.
Safety Equipment
- Gloves:Protect your hands from cuts and scrapes while handling tools and parts.
- Safety Glasses:Keep your eyes safe from debris and unexpected accidents.
- Dust Mask:If you’re working in a dusty environment, a mask can protect your lungs.
Gathering these tools not only prepares you for the task but also enhances your confidence. Have you ever started a project only to realize you didn’t have the right tools? It can be frustrating. Being well-prepared can make all the difference.
With the right tools in hand, you’re ready to tackle your generator starter rope repair. Don’t underestimate the importance of preparation—it sets the stage for a successful outcome.
Removing The Broken Rope
Removing a broken starter rope from your generator is a simple task. It requires just a few tools and some patience. Follow these steps to make the process easy.
Gather Your Tools
Before starting, gather the necessary tools. You will need a screwdriver, pliers, and a replacement rope. Make sure you have everything ready. This saves time and effort.
Access The Starter Housing
Locate the screws on the starter housing. Use a screwdriver to remove them. Carefully lift the cover off. Be gentle to avoid damaging the housing.
Remove The Old Rope
Find the broken rope inside the housing. It may be tangled or stuck. Use pliers to pull out any remaining pieces. Take your time to ensure you get it all.
Inspect The Pulley
Check the pulley for any damage. Ensure it spins freely. If it is stuck, clean it with a cloth. A clean pulley helps the new rope work smoothly.
Prepare For Replacement
Now that the old rope is removed, prepare for the new one. Measure the length of the new rope. Cut it to size based on your generator’s specifications.
Inspecting The Pulley Mechanism
Inspect the pulley mechanism carefully. Look for any signs of wear or damage. A smooth pulley is key to fixing the generator starter rope effectively. Ensure that the rope winds evenly around the pulley for proper function.
Inspecting the pulley mechanism is a crucial step when fixing your generator’s starter rope. A well-functioning pulley ensures that the rope winds and unwinds smoothly. Neglecting this part can lead to further issues, making your generator unreliable when you need it most.
Check For Debris And Damage
Start by examining the pulley for any signs of debris. Dirt, dust, or small objects can get lodged in the mechanism, causing it to malfunction. – Remove any visible debris using a soft brush or cloth. – Look for cracks or wear on the pulley. Any damage here can lead to serious problems down the line. Have you ever tried to start a generator only to find it won’t budge? Often, the issue lies right here, in the pulley.
Test The Spring Tension
Next, focus on the spring mechanism. The spring provides the necessary tension for the pulley to operate effectively. – Gently pull the starter rope and release it. The rope should retract smoothly. – If it doesn’t, the spring may be loose or broken. A personal experience taught me the importance of checking the spring. I once struggled with a generator that wouldn’t start. After inspecting the spring, I discovered it was detached. A quick fix saved me from a long day without power.
Inspect The Pulley Alignment
Proper alignment is essential for the pulley to function correctly. Misalignment can cause the rope to fray or jam. – Check the alignment of the pulley with the casing. It should sit evenly without any tilt. – Adjust as necessary to ensure a snug fit. Have you noticed any unusual noises when starting your generator? Misalignment could be the culprit, affecting both performance and longevity.
Lubricate The Mechanism
Finally, consider lubricating the pulley mechanism. Proper lubrication helps it run smoothly and reduces wear. – Use a light machine oil for best results. – Apply a small amount to the moving parts, ensuring not to overdo it. Regular maintenance of the pulley can prevent issues before they start. What steps have you taken to keep your generator in top shape?
Choosing The Right Replacement Rope
Choosing the right replacement rope is key for fixing a generator starter. Look for durable materials that match the original size. Proper fit ensures smooth operation and extends the life of your generator. Prioritize quality to avoid future issues and maintain performance.
Choosing the right replacement rope for your generator starter can significantly impact its performance and longevity. A well-chosen rope enhances the efficiency of starting your generator and ensures that it functions smoothly. Here’s what you need to consider when selecting a replacement rope.
Understand The Specifications
Before purchasing a replacement rope, check the specifications of your generator. – Length: Measure the existing rope to ensure you get the correct length. – Diameter: A thicker rope may offer more durability but could be harder to pull. – Material: Look for ropes made from durable materials like nylon or polypropylene. Always refer to your generator’s manual for specific recommendations. This step can save you time and money in the long run.
Evaluate The Rope’s Strength
Not all ropes are created equal. – Breaking Strength: Ensure the rope can handle the force required to start your generator. – Weight Capacity: Choose a rope that can support the demands of frequent use. A strong rope reduces the risk of snapping during operation. You don’t want to be stranded with a faulty starter rope.
Consider The Weather Conditions
Your environment plays a crucial role in rope selection. – UV Resistance: If you use your generator outdoors, opt for UV-resistant ropes to prevent deterioration. – Water Resistance: Ropes that repel water will last longer in wet conditions. Think about the conditions your generator faces. A little foresight can prevent future headaches.
Check For Compatibility
Make sure the rope you choose is compatible with your generator model. – Brand Recommendations: Some brands offer specific ropes designed for their generators. – User Reviews: Look for feedback from other users to gauge performance. Compatibility ensures that the rope fits well and performs as expected. This step helps avoid unnecessary frustration.
Test The Rope Before Full Use
Once you have your new rope, test it out before relying on it. – Ease of Pull: Check how smoothly the rope pulls. – Handling Comfort: Ensure it feels comfortable in your hand. Testing allows you to make adjustments if needed. Don’t skip this crucial step. Choosing the right replacement rope can be a game-changer for your generator. By considering specifications, strength, environmental factors, compatibility, and testing, you’ll ensure that your generator starts smoothly every time. What challenges have you faced with your starter rope? Share your experiences to help others in the community.
Installing The New Rope
Installing a new starter rope on your generator might seem daunting, but it’s a straightforward task that can save you time and money. A well-installed rope ensures your generator starts smoothly every time. Here’s how to do it step by step.
Gather Your Tools
Before you start, make sure you have everything you need. Here’s a quick list:
- New starter rope (appropriate length and thickness)
- Screwdriver
- Scissors or a knife
- Needle nose pliers
- Safety goggles
Having these tools ready will make the process much smoother.
Remove The Old Rope
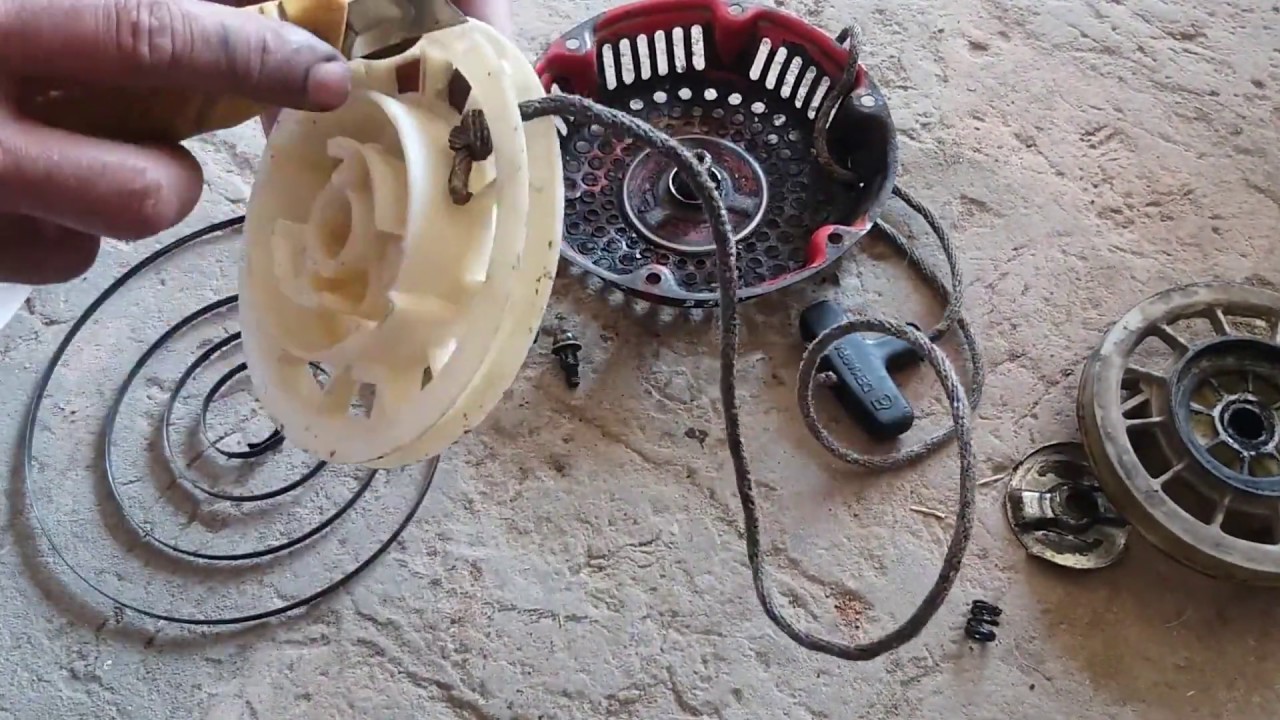
Begin by disconnecting the generator from any power source. Safety first! Next, locate the recoil starter assembly. Unscrew any screws holding it in place, and carefully remove the assembly.
Once removed, inspect the old rope. If it’s frayed or broken, cut it away carefully. Use the needle nose pliers to pull out any remnants from the spool.
Measure And Cut The New Rope
Now it’s time to prepare your new starter rope. Measure the length needed by comparing it to the old rope, but be sure to add a little extra. About 2 to 3 feet should suffice.
After measuring, cut the new rope with scissors or a knife. Ensure the ends are cleanly cut to avoid fraying.
Attach The New Rope
Thread the new rope through the hole in the recoil starter assembly. Make sure it aligns properly with the spool. Then, tie a secure knot at the end of the rope to prevent it from slipping back through.
Pull the rope taut, and wind it around the spool in the same direction as the old rope was wound. This is crucial for it to function correctly.
Reassemble The Starter Assembly
Carefully place the recoil starter assembly back onto the generator. Make sure it fits snugly and securely. Reattach all screws to ensure everything is in place.
Finally, test the rope by pulling it gently. It should retract smoothly and easily. If it does, you’re all set!
Test Your Generator
After installation, it’s important to test your generator. Start it up and listen for any unusual sounds. The new rope should allow for a smooth start without any hiccups.
Feeling confident with your DIY skills? Taking on small repairs like this can empower you to handle more significant issues in the future.
Credit: www.tiktok.com
Testing The Starter Rope
Testing the starter rope is an important step in fixing your generator. A faulty starter rope can prevent your generator from starting. Understanding how to test it helps you identify problems quickly.
Visual Inspection
Start with a visual inspection of the starter rope. Look for frays or cuts. Check for signs of wear. A damaged rope needs replacement.
Pulling The Rope
Next, pull the starter rope gently. It should move smoothly. Feel for any resistance. If the rope sticks or feels rough, there may be an issue.
Check The Spring Mechanism
The spring mechanism is key to the starter rope’s function. Remove the cover to access it. Inspect the spring for damage or misalignment. A broken spring can cause issues.
Testing For Return
After pulling the rope, let it go. It should return smoothly. A slow return means the mechanism is not functioning well. This could lead to starting problems.
Listening For Sounds
Listen for unusual sounds while testing. Strange noises may indicate internal damage. Pay attention to any grinding or clicking noises.
Final Check
After testing, make a final check. Ensure all components are secure. A loose part can cause further issues. Proper testing leads to better repairs.
Maintenance Tips For Longevity
Taking care of your generator starter rope is important. Regular maintenance helps it last longer. Simple steps can prevent future problems. Follow these tips to keep your starter rope in good shape.
Regular Inspection
Check the starter rope often. Look for signs of wear and tear. A frayed rope can break easily. Replace it before it fails. Regular checks save time and money.
Keep It Clean
Clean the generator regularly. Dust and dirt can affect the starter rope. Use a soft cloth to wipe it down. Make sure no debris gets stuck in the mechanism. A clean generator works better.
Lubricate Moving Parts
Use oil on the moving parts. This keeps them running smoothly. Apply a small amount of lubricant. Avoid over-lubrication. Too much oil can cause problems.
Store Properly
Store the generator in a dry place. Moisture can damage the starter rope. Use a cover to protect it from dust. Proper storage extends its life.
Follow The Manual
Read the manufacturer’s manual. It has important maintenance tips. Follow the guidelines for best results. This ensures the generator works efficiently.
Credit: m.youtube.com
Frequently Asked Questions
How Do I Know If My Generator Rope Is Broken?
A broken generator starter rope typically shows signs of fraying or snapping. If the rope doesn’t retract or feels loose, it’s likely damaged. Inspect the rope closely for any visible wear or breakage. Regular maintenance helps prevent future issues and ensures optimal performance.
What Tools Do I Need To Fix The Starter Rope?
To fix a generator starter rope, you’ll need a few basic tools. A screwdriver, replacement rope, scissors, and pliers are essential. Additionally, having a wrench might be helpful for loosening any bolts. Ensure you have the right replacement parts for your specific generator model.
Can I Replace The Starter Rope Myself?
Yes, you can replace the starter rope yourself. The process is straightforward and requires minimal tools. Follow the manufacturer’s guidelines for your specific generator. With patience and care, you can successfully fix the rope without professional help, saving time and money.
How Often Should I Check My Generator’s Starter Rope?
It’s advisable to check your generator’s starter rope every few months. Regular inspections help identify wear and tear early. This proactive approach prevents unexpected failures during use. Keeping your equipment in good condition prolongs its life and ensures reliable performance when needed.
Conclusion
Fixing a generator starter rope is easy. Follow the steps outlined in this post. Gather the right tools and materials first. This makes the process smoother. Take your time to avoid mistakes. Regular maintenance can also help prevent future issues.
A well-functioning starter rope ensures your generator works when needed. Don’t hesitate to tackle this task yourself. You can save money and gain confidence. With a little effort, your generator will be ready for any job. Enjoy the peace of mind that comes with a reliable generator.