
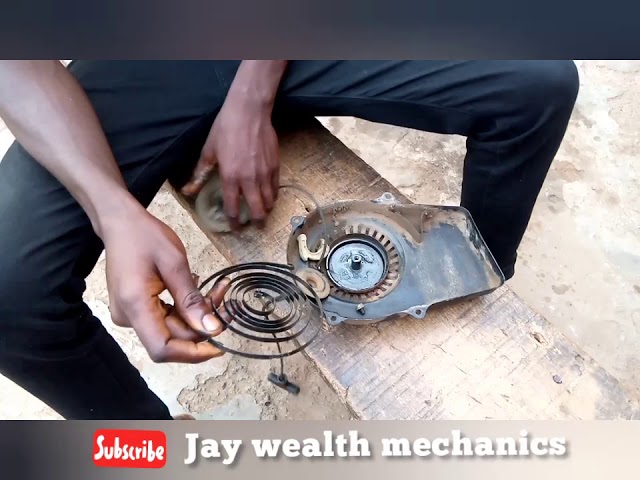
Is your generator refusing to start, leaving you frustrated and in the dark? One common culprit could be a faulty starter spring.
If you’re feeling overwhelmed or unsure about how to fix it, don’t worry—you’re not alone. This guide will walk you through the simple steps to get your generator back in action. By the end, you’ll have the confidence to tackle the issue yourself.
Imagine the satisfaction of solving the problem and restoring power to your home! Stick around, and let’s get your generator running smoothly again.
Common Signs Of A Faulty Starter Spring
The starter spring plays a crucial role in your generator. It helps start the engine. If the spring is faulty, you may face several issues. Recognizing these signs early can prevent bigger problems later.
1. Difficulty Starting The Generator
If the generator struggles to start, check the starter spring. A weak spring can cause this issue. You may hear a clicking sound but see no movement.
2. Loud Noises During Start-up
Unusual loud noises can signal a problem. A faulty starter spring may create grinding sounds. This happens when the spring fails to engage properly.
3. Generator Stalling
Stalling during operation often points to a starter spring issue. The engine may stop suddenly. This can lead to a frustrating experience.
4. Visible Damage To The Spring
Inspect the starter spring for physical damage. Look for cracks, rust, or breakage. Any visible damage means it needs replacement.
5. Inconsistent Starting Behavior
Inconsistent starting can indicate a faulty spring. Sometimes the generator starts, and other times it doesn’t. This inconsistency is a major red flag.
6. Weak Pull Cord Resistance
A weak pull cord can also point to a starter spring problem. Pulling the cord should feel firm. If it feels loose, check the spring’s condition.
Safety Precautions To Follow
Fixing a generator starter spring can be a straightforward task, but it comes with its own set of risks. Prioritizing safety ensures that you don’t face unnecessary injuries or damage. Here are essential safety precautions to follow while working on your generator.
Wear Protective Gear
Your safety starts with the right gear. Always wear gloves to protect your hands from sharp edges and hot components. Safety goggles shield your eyes from dust and debris.
Don’t forget about sturdy footwear. Closed-toe shoes prevent injuries from heavy objects that might fall. If you’re working in a noisy environment, consider ear protection too.
Disconnect The Power Source
Before you begin any repairs, always disconnect the generator from its power source. This simple step eliminates the risk of electric shock. Confirm that the generator is off and no residual power remains.
Taking this precaution helps you focus on your task without worrying about unexpected starts. It’s a small step that provides significant peace of mind.
Work In A Well-ventilated Area
Ensure your workspace is well-ventilated. Generators can emit harmful fumes, especially if they are gas-powered. Fresh air helps reduce the risk of inhalation and keeps you alert.
Open windows or use fans to improve air circulation. If possible, work outdoors to further minimize any risks.
Keep Tools Organized
Always keep your tools organized and within reach. A cluttered workspace can lead to accidents, such as tripping or dropping tools. Take a moment to arrange your tools before starting the repair.
Using a toolbox can help keep everything in one place. This practice not only enhances safety but also makes your work more efficient.
Follow Manufacturer Instructions
Refer to the generator’s manual for specific repair guidelines. Each model has unique features and safety recommendations. Following these instructions helps you avoid mistakes that could lead to injury.
When in doubt, consult online tutorials or forums for additional support. Engaging with others who have experience can provide valuable insights.
As you prepare to fix your generator starter spring, remember that safety is your top priority. Taking these precautions not only protects you but also ensures a smoother repair process.
Tools And Materials Needed
Fixing a generator starter spring requires specific tools and materials. Having the right items makes the job easier and faster. Gather everything before starting the repair. This way, you avoid interruptions.
Basic Tools
Start with simple tools. You will need a screwdriver. A flathead and a Phillips screwdriver are essential. A pair of pliers is also useful. Use them for gripping and twisting wires.
Wrenches
Get a set of wrenches. These help in loosening and tightening bolts. Make sure to have different sizes. A socket wrench can speed up the process.
Replacement Spring
Buy a new starter spring. The right size matters. Check your generator’s manual for specifications. A good quality spring lasts longer.
Safety Gear
Wear safety gear for protection. Use gloves to protect your hands. Safety goggles will shield your eyes from debris.
Cleaning Supplies
Have cleaning supplies on hand. Rags and a brush can remove dirt. Clean parts ensure better performance. Use a small container for loose screws and small parts.
Lubricant
Use lubricant for smooth operation. A light oil is best. This prevents rust and helps parts move freely. Apply it after installation.
Credit: www.tiktok.com
Locating The Starter Spring
Finding the starter spring in a generator is crucial for repairs. First, turn off the generator and disconnect the battery. Next, locate the starter assembly, usually near the engine. Examine the spring carefully for any damage or wear. This step is essential for a successful fix.
Locating the starter spring in your generator is crucial for a smooth repair process. Without knowing exactly where to find it, you risk wasting time and potentially damaging your equipment. Whether you’re a DIY enthusiast or just need to troubleshoot, understanding the layout of your generator will make your task easier.
Understanding Your Generator’s Layout
First, familiarize yourself with your generator’s manual. It contains valuable diagrams and details about each component. This will help you visualize where the starter spring is located. Look for the starter assembly, which is typically found near the engine casing. You’ll often see it near the recoil pull start mechanism.
Identifying The Starter Spring
The starter spring is a coiled metal piece that helps recoil the starter rope. This spring works by storing energy when you pull the rope and then releasing it to rewind the rope after starting the engine. Check for any signs of wear or damage. A broken spring can lead to starting issues, so it’s important to identify it quickly.
Accessing The Starter Spring
To access the starter spring, you’ll need to remove the recoil housing. This usually involves unscrewing a few bolts. Be careful while doing this; you don’t want to strip the screws. Keep a small container nearby to hold the screws so you don’t lose them.
Visual Inspection
Once you’ve removed the housing, visually inspect the starter spring. Look for any signs of rust, breaks, or deformities. If it looks damaged, it’s time for a replacement. If it seems intact, you might just need to clean it and check the tension. Locating the starter spring is straightforward if you take the time to understand your generator’s components. Have you faced challenges while trying to find parts in your generator? Knowing where to look can save you both time and frustration.
Removing The Starter Assembly
Removing the starter assembly is a key step in fixing a generator starter spring. It involves detaching parts carefully to access the spring. This process ensures you can repair or replace the spring effectively, restoring your generator’s functionality.
Removing the starter assembly from your generator can seem daunting, but with the right steps, you can tackle it confidently. This process is crucial, especially when you need to fix the starter spring. Let’s break down how to effectively remove the starter assembly so you can get your generator up and running again.
Gather The Necessary Tools
Before you begin, ensure you have the following tools on hand:
- Socket set
- Screwdriver set
- Wrench
- Flashlight
- Safety gloves
Having the right tools makes the process smoother and faster. Trust me; it saves time and frustration later.
Disconnect The Power Source
Safety should always come first. 1. Disconnect the generator from any power source. 2. Remove the spark plug to prevent accidental starts. This step protects you from potential hazards during the removal process.
Locate The Starter Assembly
Next, locate the starter assembly. It’s typically found near the engine’s flywheel. Familiarize yourself with the layout of your generator. Understanding its components can help you navigate the removal process more easily.
Remove Fasteners And Connectors
Now, you need to remove any screws or bolts securing the starter assembly. Use your socket set or screwdriver for this task. Keep track of the fasteners; a small container can help you avoid losing them.
Gently Detach The Starter Assembly
With the fasteners removed, gently pull the starter assembly away from the engine. Be cautious not to force it, as this could damage any connected wires or components. If you encounter resistance, double-check for any remaining screws or connectors.
Inspect The Assembly For Damage
Once detached, inspect the starter assembly closely. Look for any signs of wear or damage, especially on the spring. Identifying issues here can prevent future problems. Removing the starter assembly is a key step in fixing the generator starter spring. With the right approach, you can manage this task effectively. What challenges do you anticipate facing during the removal process? Understanding these challenges can help you prepare better.
Inspecting The Spring For Damage
Inspect the generator starter spring for any signs of wear or damage. Look for bends, breaks, or rust. Fixing these issues early can ensure your generator works smoothly when needed.
Inspecting the spring for damage is a crucial step in fixing your generator starter. A damaged spring can lead to starting issues and could even cause more significant problems in the long run. By taking the time to carefully inspect the spring, you can prevent unnecessary repairs and ensure your generator operates smoothly.
Visual Examination
Start with a visual inspection. Look closely at the spring for any signs of wear or breakage. – Check for rust or corrosion. – Look for any bends, cracks, or breaks in the coils. – A healthy spring should appear uniform and intact. If you notice any irregularities, it’s a clear signal that replacement is necessary.
Testing The Tension
Next, test the tension of the spring. A spring that feels loose may not provide enough force to engage the starter properly. – Gently pull on the spring and observe its response. – It should return to its original shape quickly and easily. – If it feels weak or doesn’t return as expected, consider replacing it. A well-functioning spring is vital for reliable generator performance.
Comparing With A New Spring
If you’re unsure about the condition of your spring, compare it with a new one. – Measure the length and thickness. – Ensure the coils are evenly spaced. – Note any differences in flexibility. This side-by-side comparison can help confirm whether your spring is still viable. Remember, even minor damage can cause significant issues down the line. Regular maintenance of your generator’s components can save you time and money. Have you checked your generator’s starter spring recently? Taking a few minutes to inspect it could spare you from frustrating starting issues later on.
Rewinding The Starter Spring
Rewinding the starter spring can seem tricky. This task is essential for generator performance. A well-wound spring helps the generator start smoothly. Let’s break down the steps to rewind it properly.
Preparing The Spring
Start by gathering your tools. You need safety gloves and goggles. These protect you during the process. Remove the starter assembly from the generator. Take note of how the spring is wound. This will help you rewind it correctly.
Next, inspect the spring for damage. Look for any breaks or rust. If the spring is damaged, consider replacing it. A good spring is crucial for effective starting.
Winding The Spring Safely
Now it’s time to rewind the spring. Hold the spring tightly in one hand. Use the other hand to wind it carefully. Make sure each turn is tight and even. Uneven winding can cause issues later.
Once you finish winding, secure the spring. Use a small piece of wire to hold it in place. Be cautious. The spring is under tension. This tension can cause injury if released suddenly.
Finally, reassemble the starter. Ensure everything is in its right place. Test the generator to see if it starts smoothly. A properly rewound spring can make a big difference.

Credit: www.youtube.com
Reassembling The Starter Mechanism
Reassembling the starter mechanism is a crucial step. It ensures your generator works well. Follow these steps carefully. A proper assembly can prevent future issues.
Gather All Components
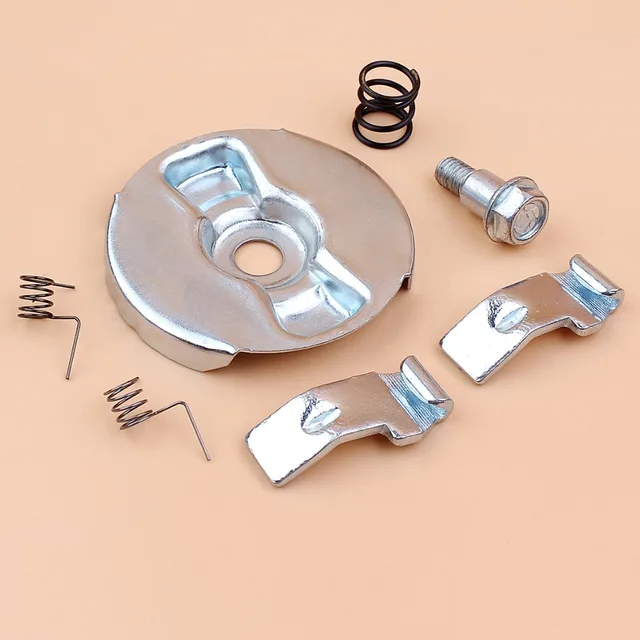
Start by collecting all parts. Find the starter spring, housing, and pawls. Ensure you have screws and any other small parts. Keep everything organized. This makes reassembly easier.
Check The Starter Spring
Inspect the starter spring for damage. Look for bends or breaks. A damaged spring will not function properly. Replace it if necessary. A good spring helps the starter engage smoothly.
Position The Pawls
Next, place the pawls in their correct spots. These parts help grip the flywheel. Make sure they move freely. Misplaced pawls can cause starting problems.
Insert The Starter Spring
Carefully insert the starter spring into the housing. Align it with the pawls. Ensure it sits correctly. A misaligned spring can cause tension issues.
Secure The Housing
Once everything is in place, secure the housing. Use the screws to hold it tightly. Ensure no gaps are present. A tight fit keeps the mechanism stable.
Test The Mechanism
After reassembling, test the starter mechanism. Pull the starter cord gently. It should move smoothly without resistance. If it feels stuck, check your assembly.
Final Inspection
Finally, inspect all parts once more. Look for any loose screws or misalignments. Ensure everything is working correctly. A thorough check helps avoid issues later.
Testing The Generator Starter
Testing the generator starter helps ensure it works properly. A faulty starter can lead to generator issues. Knowing how to test it saves time and effort. Let’s explore the steps to check your generator starter.
Gather Your Tools
Before starting, gather necessary tools. You will need a multimeter, screwdrivers, and safety gloves. These tools will help you conduct tests safely and accurately.
Inspect The Starter
Begin by visually inspecting the starter. Look for any signs of damage or wear. Check for loose connections or corrosion. These issues can affect performance.
Test The Voltage
Use the multimeter to test the voltage. Set it to the DC voltage setting. Connect the leads to the starter terminals. A reading below the recommended voltage indicates a problem.
Check The Solenoid
The solenoid is crucial for the starter’s function. Test it by applying direct power. Listen for a clicking sound. A click means it is working; no sound indicates a faulty solenoid.
Examine The Starter Gear
Inspect the starter gear for damage. It should move freely without obstruction. Any sticking or grinding noise can signal a problem. Replace the gear if necessary.
Test The Starter Motor
Finally, test the starter motor itself. Remove it from the generator. Connect it directly to a power source. The motor should spin smoothly. Any hesitation means it may need replacement.
Credit: www.aliexpress.com
Tips To Prevent Future Spring Issues
Preventing future issues with your generator’s starter spring is important. Simple steps can help you avoid problems later. Regular maintenance can keep your generator running smoothly. Here are some tips to help you.
Regular Inspections
Check the starter spring often. Look for signs of wear or damage. Early detection can save you time and money. Inspect the spring for rust or corrosion. Replace it if needed.
Keep The Area Clean
Clean the generator’s area regularly. Dust and dirt can cause parts to wear out. A clean workspace helps you see issues clearly. Remove any debris that can block the generator.
Use Quality Parts
Always use high-quality replacement parts. Cheap parts can fail quickly. Quality springs last longer and perform better. Invest in good materials to avoid future repairs.
Follow The Manufacturer’s Guidelines
Read the generator’s manual carefully. Follow all recommended maintenance steps. Proper care can prevent many issues. Stick to the schedule for servicing your generator.
Avoid Overloading
Do not overload your generator. Excessive strain can damage the starter spring. Use the generator within its limits. This helps maintain its performance and longevity.
Store Properly
Store your generator in a dry place. Moisture can lead to rust and damage. Use a cover to protect it from dust and dirt. Proper storage extends the life of all parts.
Frequently Asked Questions
How Do I Know If My Generator Starter Spring Is Faulty?
You can identify a faulty starter spring by observing performance issues. If your generator is slow to start or won’t start at all, the starter spring might be damaged. Additionally, unusual noises during startup can indicate a problem. Regular maintenance checks can also help diagnose issues early.
What Are The Signs Of A Bad Starter Spring?
Signs of a bad starter spring include difficulty starting the generator, excessive noise, or the starter not engaging properly. You may also notice the spring being visibly worn or broken. If you experience any of these symptoms, it’s crucial to inspect the starter spring promptly to avoid further damage.
Can I Replace The Starter Spring Myself?
Yes, replacing the starter spring can be a DIY task. Ensure you have the right tools and safety equipment before starting. Follow the manufacturer’s instructions carefully and take your time to avoid mistakes. If you feel unsure, consider seeking professional assistance for safety reasons.
What Tools Do I Need To Fix The Starter Spring?
To fix the starter spring, you will need basic hand tools like screwdrivers, pliers, and a socket set. A torque wrench can help ensure proper tightening. Additionally, having a replacement spring and safety gear like gloves and goggles will enhance your safety during the repair process.
Conclusion
Fixing a generator starter spring is straightforward. Follow the steps carefully to avoid issues. Check the spring for damage before starting. Replace it if necessary. Proper installation ensures your generator works well. Regular maintenance helps prevent future problems. A little care goes a long way.
With patience and the right tools, you can do this. Enjoy a reliable generator by keeping it in good shape. Your efforts will pay off when you need it most.