

Keeping your generator running smoothly means taking care of one simple but crucial task: changing its oil regularly. If you’ve never done it before, the idea might feel a bit overwhelming.
But don’t worry—changing the oil in your generator is easier than you think. By learning the right steps, you can protect your investment, avoid costly repairs, and ensure your generator is ready whenever you need it. In this guide, you’ll find clear, step-by-step instructions that anyone can follow.
Ready to save time and money while extending your generator’s life? Let’s get started.
Tools And Materials
Changing the oil in your generator requires certain tools and materials. Having these ready makes the task easier and safer. Prepare everything before starting the oil change.
Use only the right supplies to protect your generator’s engine. This ensures it runs smoothly for a long time.
Essential Tools For Changing Generator Oil
Gather these basic tools before you begin. A wrench or socket set helps remove the drain plug. A funnel makes pouring new oil neat and simple. Use a clean rag to wipe spills and check the dipstick.
Required Materials For An Oil Change
Choose the correct oil type recommended by your generator’s manual. Buy a fresh oil filter if your model needs one. Have a drain pan ready to catch old oil safely. Proper disposal containers keep the environment safe.
Safety Gear To Use
Wear gloves to protect your hands from hot oil and dirt. Safety glasses guard your eyes from splashes. Work in a well-ventilated area to avoid inhaling fumes.
Safety Precautions
Changing the oil in your generator is an important task. Safety must come first to avoid accidents and injuries. Follow these safety precautions to keep yourself safe during the oil change process.
Turn Off And Disconnect The Generator
Make sure the generator is completely off. Remove the spark plug wire or unplug it from any power source. This prevents the generator from starting accidentally while you work.
Allow The Engine To Cool
Run the generator for a few minutes to warm the oil. Then, turn it off and wait at least 30 minutes. Hot oil and engine parts can cause burns if touched too soon.
Wear Protective Gear
Use gloves to protect your hands from hot oil and dirt. Safety glasses shield your eyes from splashes. Wear old clothes or a coverall to avoid stains.
Work In A Well-ventilated Area
Perform the oil change outside or in a space with good airflow. Fumes from oil and fuel can be harmful if inhaled in closed areas.
Use Proper Tools And Containers
Use a wrench that fits the drain plug correctly. Place a large, leak-proof container under the plug to catch old oil. Avoid spills by positioning the container carefully.
Preparing The Generator
Preparing the generator is the first step to changing the oil safely and effectively. Proper preparation ensures a smooth oil change and protects both you and your generator. Take your time to get everything ready before starting.
Begin by turning off the generator and unplugging it from any power sources. This prevents accidental starts and electrical hazards. Let the engine cool down for at least 30 minutes. Warm oil flows better, but hot oil can cause burns.
Locate The Generator On A Flat, Stable Surface
Place the generator on a flat and stable surface. This stops it from moving or tipping during the oil change. A level surface also helps the oil drain completely and evenly.
Gather All Necessary Tools And Supplies
Collect everything needed before starting. You will need fresh oil, an oil drain pan, a wrench or socket set, and clean rags. Having tools nearby saves time and avoids interruptions.
Check The Owner’s Manual For Oil Type And Quantity
Read the owner’s manual to find the right oil type and amount. Using the wrong oil can damage the engine. The manual also provides specific instructions for your generator model.
Prepare The Drain Pan And Protective Gear
Place a drain pan under the oil drain plug to catch used oil. Wear gloves to protect your hands from hot oil and dirt. Eye protection is also a good idea to avoid splashes.

Credit: www.youtube.com
Locating The Drain Plug
Locating the drain plug is the first step in changing your generator’s oil. The drain plug is usually a small bolt near the engine’s base. It allows the old oil to flow out safely. Knowing its exact location helps prevent spills and speeds up the oil change process.
Most generators have the drain plug on the underside of the engine. This placement makes it easier for oil to drain completely. Some models may have a protective cover, so check carefully. Using a flashlight can help spot the plug clearly.
Identify The Engine’s Base
Start by finding the lowest part of the generator’s engine. The drain plug is near this area. It is often a hexagonal bolt, different from other bolts on the engine. Feeling around gently can help confirm its position.
Check Your Generator Manual
Your generator’s manual shows the drain plug location. It may include pictures or diagrams. Manuals provide exact details for your specific model. If you do not have a physical copy, check the manufacturer’s website for a PDF version.
Use Proper Lighting
Good lighting helps locate the drain plug quickly. Use a flashlight or work light to see under the engine. Shadows can hide the plug, so move the light around. Clear visibility prevents mistakes and saves time.
Look For Oil Residue
Oil stains near the bottom of the engine often mark the drain plug spot. Old oil may have leaked slightly, leaving marks. These stains guide you to the correct bolt. Wipe the area clean before starting the oil change.
Warming Up The Oil
Warming up the oil is a crucial step before changing it in your generator. Cold oil is thick and drains slowly. Warm oil flows easier, carrying more dirt and debris out. This helps clean the engine better and makes oil change faster.
Running the generator for a few minutes heats the oil to the right temperature. Do not run it too long. Just enough to make the oil warm, not hot. Warm oil protects your hands and prevents burns during draining.
Start The Generator
Turn on your generator and let it run for 5 to 10 minutes. This warms the engine and the oil inside. Keep the area well-ventilated to avoid fumes buildup. Listen for normal running sounds to ensure the generator works properly.
Turn Off And Cool Slightly
Switch off the generator carefully. Wait about 5 minutes for the oil to cool a little. Oil should feel warm to touch, not hot. This reduces the risk of burns when you remove the drain plug.
Prepare For Oil Drain
Place a drain pan under the oil drain plug to catch the used oil. Use gloves to protect your hands. Have rags ready for any spills. Warm oil will drain smoothly and completely from the generator.
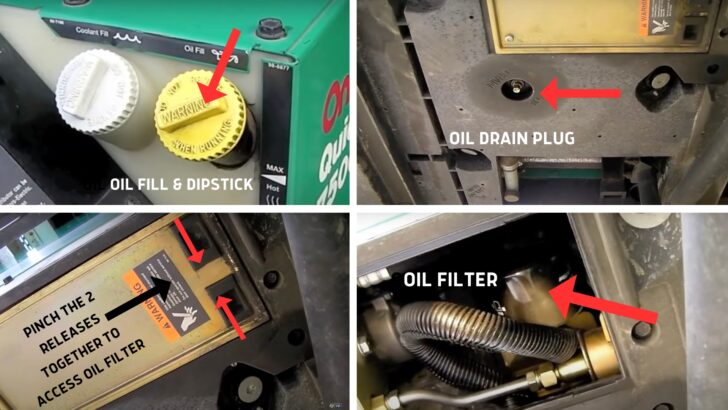
Credit: www.thervgeeks.com
Draining Old Oil
Draining old oil is an essential step in maintaining your generator. Removing used oil prevents engine damage and keeps your generator running smoothly. This process requires care to avoid spills and burns. Follow each step carefully to ensure safe and complete oil drainage.
Prepare The Generator For Draining
Turn off the generator and disconnect any power sources. Let the engine cool for at least 10 minutes. Warm oil drains faster but can cause burns if too hot.
Locate The Drain Plug
Find the drain plug at the bottom of the engine. It looks like a small bolt or screw. Check your generator’s manual if unsure of the exact spot.
Position The Drain Pan
Place a drain pan directly under the drain plug. Use a container large enough to hold all the old oil. This prevents spills and keeps your workspace clean.
Remove The Drain Plug
Use a wrench to loosen the drain plug carefully. Let the oil flow out completely into the drain pan. Avoid touching the oil as it may still be warm.
Replace The Drain Plug
Once the oil drains fully, clean the drain plug and its area. Screw the plug back tightly to avoid leaks. Check that it is secure but do not overtighten.
Replacing The Drain Plug
Replacing the drain plug is a key step in changing your generator’s oil. This simple task stops the old oil from leaking out after draining. It also prevents dirt and debris from entering the engine. Properly securing the drain plug keeps your generator running smoothly.
Use the right tools and take care not to overtighten the plug. A loose or damaged drain plug can cause oil leaks or engine damage. Follow these easy steps to replace the drain plug correctly.
Locate The Drain Plug
Find the drain plug at the bottom of your generator’s engine. It usually looks like a small bolt or screw. Check your generator’s manual if you have trouble finding it. Make sure the generator is off and cooled before touching the plug.
Clean The Area Around The Plug
Wipe the area around the drain plug with a clean cloth. Remove dirt and oil to avoid contamination. This keeps the engine clean and helps the plug seal tightly. A clean surface prevents leaks and engine problems.
Inspect The Drain Plug And Washer
Check the drain plug and its washer for damage or wear. Replace the washer if it looks cracked or flattened. A good washer ensures a tight seal. Using a damaged washer can cause oil to drip out.
Reinstall The Drain Plug
Put the drain plug back into its hole by hand. Turn it gently to avoid cross-threading. Use a wrench to tighten the plug firmly, but do not over-tighten. Over-tightening can strip the threads or break the plug.
Check For Leaks
After replacing the plug, wipe the area dry. Start the generator and let it run for a few minutes. Turn it off and check the drain plug for any oil leaks. Tighten the plug slightly if you see small leaks. Make sure the plug is secure before refilling oil.
Adding New Oil
Adding new oil to your generator is a key step after draining the old oil. Fresh oil keeps the engine parts moving smoothly and protects against wear. Use the correct type and amount of oil for your specific generator model. This ensures the engine runs efficiently and lasts longer.
Check Oil Type And Amount
Refer to the generator’s manual for oil specifications. Use the recommended oil viscosity and grade. Using the wrong oil can harm the engine. Measure the correct amount to avoid overfilling or underfilling. Both conditions can cause engine problems.
Use A Funnel For Clean Filling
Place a clean funnel into the oil fill hole. This prevents spills and keeps dirt out. Slowly pour the new oil into the funnel. Stop occasionally to check the oil level with the dipstick. Clean oil means cleaner engine performance.
Check Oil Level After Filling
Insert the dipstick and pull it out to check the level. The oil should be between the low and full marks. Add more oil if the level is low. Avoid filling past the full mark to prevent damage. Proper oil level keeps your generator safe and working well.
Checking Oil Level
Checking the oil level is a key step before changing the oil in your generator. It ensures the engine has enough oil to run smoothly and prevents damage. Regular checks help spot leaks or oil consumption issues early.
To check the oil level, you need to use the dipstick or sight glass on your generator. This step helps confirm if the oil needs changing or just topping up.
Locate The Oil Dipstick
Find the oil dipstick on the side of the engine. It usually has a bright handle for easy spotting. Make sure the generator is off and on a flat surface before checking.
Remove And Clean The Dipstick
Pull out the dipstick slowly. Wipe it clean with a rag or paper towel. This removes old oil, giving a clear reading when reinserted.
Check The Oil Level
Insert the dipstick fully back into the tube. Pull it out again and look at the oil mark. The oil should be between the minimum and maximum marks.
Assess Oil Condition
Look at the oil color and thickness on the dipstick. Clean oil is amber and clear. Dark or dirty oil means it’s time to change it.
Disposing Used Oil
Disposing used oil properly is crucial for protecting the environment and your community. Used generator oil contains harmful substances that can pollute soil and water. Never pour it down drains, on the ground, or in the trash. Safe disposal helps keep nature clean and prevents health risks.
Many places have special collection points for used oil. You can take your oil to these centers for free or a small fee. Some auto shops and recycling centers accept used oil. Check local guidelines to find the closest disposal site.
Store Used Oil Safely
Use a clean, leak-proof container to store used oil. Label the container clearly as “Used Oil.” Keep it sealed tightly to avoid spills. Store the container in a cool, dry place away from children and pets. Proper storage prevents accidents and contamination.
Find A Local Recycling Center
Search for nearby recycling centers that accept used oil. Many centers recycle oil into new products. Recycling reduces waste and saves resources. Contact the center to learn about their drop-off hours and rules.
Do Not Mix Used Oil
Keep used oil separate from other liquids. Mixing with antifreeze, paint, or gasoline makes recycling impossible. Contaminated oil must be treated as hazardous waste. Always pour only pure used oil into the storage container.

Credit: www.youtube.com
Frequently Asked Questions
How Do You Drain The Oil From A Generator?
Turn off the generator and let it cool. Place a drain pan under the drain plug. Remove the plug and let oil drain completely. Reinstall the plug tightly. Refill with fresh oil and check the level with the dipstick. Dispose of used oil properly.
How Often Should You Change The Oil In Your Generator?
Change your generator’s oil every 50-100 hours of use or at least once per season. Always follow the manufacturer’s guidelines.
Is It Easy To Change Generator Oil?
Yes, changing generator oil is easy with basic tools. Warm the engine, drain old oil, replace the plug, refill fresh oil, and check levels.
How Many Quarts Of Oil Go In A Generator?
Most portable generators require between 0. 6 to 1. 2 quarts of oil. Always check your generator’s manual for exact capacity.
How Often Should I Change The Oil In My Generator?
Change the oil every 50 to 100 hours of use or at least once a year.
What Type Of Oil Is Best For My Generator?
Use SAE 10W-30 oil for most generators; check your manual for specifics.
How Do I Safely Drain Oil From A Generator?
Warm the engine, cool slightly, place a pan under the drain plug, then remove it.
Can I Use Car Engine Oil For My Generator?
Yes, SAE 10W-30 car oil is usually fine, but check the generator’s manual first.
What Tools Do I Need To Change Generator Oil?
You need a wrench, oil drain pan, funnel, new oil, and a clean rag.
How Do I Check The Oil Level After Refilling?
Use the dipstick to check oil; add oil until it reaches the full mark.
Conclusion
Changing the oil in your generator keeps it running smoothly and lasts longer. Always use the right type and amount of oil. Regular oil changes prevent damage and improve performance. Take your time and follow safety steps carefully. Clean up spills and dispose of old oil properly.
With simple care, your generator will be ready when you need it most. Keep your generator healthy by changing the oil on schedule. Maintenance is easy and worth the effort.