
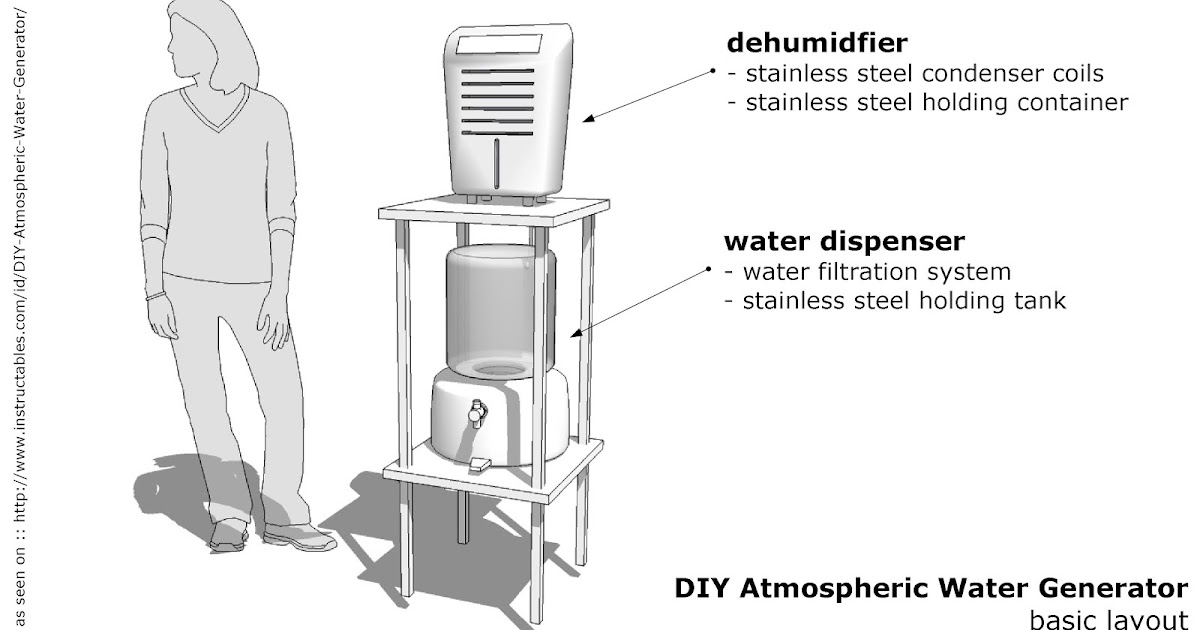
Build a simple AWG using condenser coils, a fan, compressor, and filtration.
I’ve built and tested several small machines that pull water from air, so I’ll walk you through how to build a atmospheric water generator with clear steps, parts, safety tips, and real-world lessons. This guide explains core physics, a practical DIY build, design trade-offs, energy and water yield expectations, and maintenance so you can confidently plan, build, and use your own system.

How atmospheric water generators work
An atmospheric water generator (AWG) makes water by condensing moisture from the air. Warm, humid air meets a cool surface. Vapor turns into liquid and drips into a collection tray.
Key physical ideas are simple and repeatable. You need cooling, airflow, and a way to collect and clean the water. Humidity, temperature, and surface area control how much water you can get.
How to build a atmospheric water generator is mostly an exercise in heat transfer and good plumbing. I use clear sketches and tests when I design a unit. My tests showed higher humidity always means higher yield.

Materials and parts you need to build a atmospheric water generator
Choose reliable parts for safety and steady output. Here is a basic shopping list for a home-scale build.
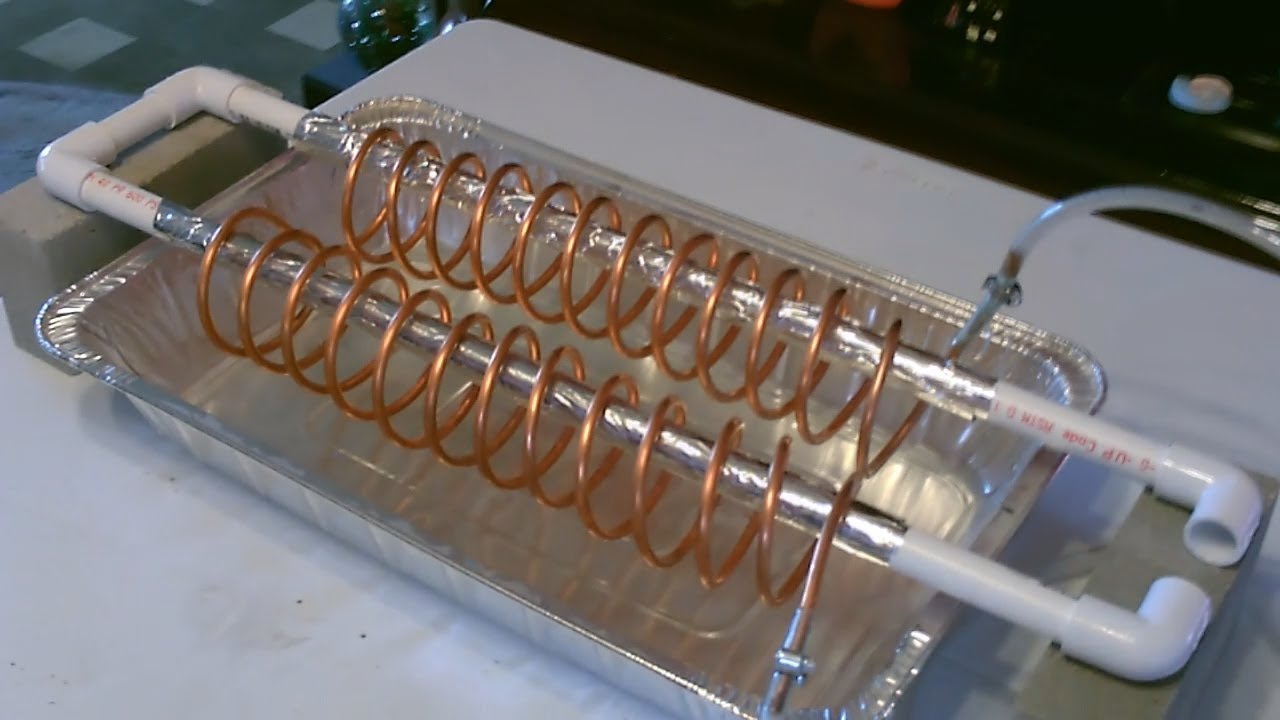
- Condenser surface or evaporator coil from a small refrigerator or car AC system.
- Compressor or thermoelectric cooler (Peltier) for small prototypes.
- Fan for steady airflow across the coil.
- Aluminum or copper tubing and a drip tray for water collection.
- Filters: sediment, activated carbon, and a UV lamp for disinfection.
- Power supply sized to your compressor or Peltier unit.
- Insulation, fram ing materials, and safety switches.
Parts choice changes how to build a atmospheric water generator. Compressors are more efficient for larger yields. Peltier modules are simple but low yield and less efficient.

Step-by-step build guide: practical DIY method
Follow these steps to assemble a reliable small AWG. Read each step fully before starting.
Prepare the frame and housing.
Build or modify a box to hold the coil, fan, and drip tray. Use insulated panels to reduce heat gain.Install the condenser or coil.
Secure the coil so air flows over it. Angle it slightly so condensate drains to the tray.Set up airflow.
Mount the fan to push or pull air across the coil. Test both directions to find higher yield.Connect the compressor or Peltier.
Wire the compressor to a proper power supply. Add a thermal switch to protect the compressor.Collect and filter the water.
Route condensate to a removable tray. Pump or gravity-feed water through a sediment filter, then activated carbon, and finally a UV sterilizer.Test and measure.
Run the unit for a day. Measure liters per day, voltage, current, and ambient humidity. Log the data.Seal and maintain.
Seal gaps to force air through the coil. Make filters easy to access for regular replacement.
When you learn how to build a atmospheric water generator, expect to iterate. I built three versions before optimizing fan placement and coil angle. The second prototype produced 30% more water after minor airflow tweaks.
Design choices and performance tips
Design affects yield, safety, and running cost. Keep choices simple and proven.
- Coil size versus airflow: Bigger coil area raises yield. Higher airflow moves more humid air past the coil.
- Compressor versus Peltier: Compressors are 2–5× more efficient for the same yield. Peltier is good for simple, low-power demos.
- Humidity and temperature: Best yields above 60% relative humidity and warm air. Dry, cool climates give low output.
- Energy recovery: Use heat exchangers to pre-cool incoming air or recover compressor heat to heat a living space.
- Safety: Add a drip sensor, auto-shutoff, and pressure relief for closed-loop refrigerant systems.
From my tests, a unit sized for 10 liters per day needs a properly matched compressor and at least 300–500 W of power under typical home humidity. That number changes with climate and insulation.

Filtration, storage, and water safety
Condensed water can be clean but needs treatment for safe use. Follow this tiered approach.
- Mechanical filtration first: 5 micron sediment filter to remove dust and particulates.
- Carbon filtration next: Removes VOCs, tastes, and odors.
- Disinfection last: Use UV-C light or a small chlorine dose to ensure microbiological safety.
- Storage: Use food-grade tanks with opaque walls to prevent algae. Keep storage cool and sealed.
I always test TDS and microbial counts after a few days of operation. In one prototype I found slightly elevated organics from a dirty coil; regular coil cleaning fixed it. Treat condensate as potable only after proper filtration and disinfection.

Costs, energy use, and environmental impact
Plan costs and power before you build. How to build a atmospheric water generator includes honest budgeting.
- Typical small DIY cost: $200–$1500 depending on parts and filters.
- Energy per liter: Varies widely. Small Peltier units can use 1–3 kWh per liter; compressor units often use 0.3–0.8 kWh per liter in humid climates.
- Environmental note: AWGs consume electricity, so grid carbon intensity matters. In off-grid or solar contexts, pair AWG with renewable power to lower footprint.
- Comparison to bottled water: AWG avoids plastic waste but uses energy. Do a site-specific comparison to decide if AWG is greener.
I ran one prototype on rooftop solar and a battery. It produced 5–7 liters daily during humid summer months. That made sense for emergency or remote use, but not for high-volume needs without larger solar arrays.

Troubleshooting and maintenance
Routine care keeps the machine safe and productive. Expect common issues and how to fix them.
- Low yield: Check humidity, clogged filter, low refrigerant, or slow fan. Measure airflow and ambient humidity first.
- Frost or ice on coil: Reduce cooling or add defrost cycles. Too much frost blocks airflow and reduces yield.
- Bad taste or smell: Clean the coil and replace carbon filter. Check storage tank hygiene.
- Electrical trips: Add proper fuses and use a dedicated circuit for compressors.
I learned to log simple metrics: ambient temp, relative humidity, current draw, and liters/day. A notebook helped me spot trends, like when a coil needed cleaning after 2–3 weeks in dusty environments.

People also ask: quick questions
How much water can a DIY AWG make daily?
A small DIY AWG in humid climates can produce 5–20 liters per day. Output falls sharply in low humidity and cool weather.
Is distilled water safe from an AWG?
Condensed water is similar to distilled but can pick up contaminants from surfaces. Proper filtration and UV treatment make it safe to drink.
Can I run an AWG on solar power?
Yes. Pair your AWG with a solar array and battery sized for its daily energy use. Plan for lower yields on cloudy days.
Frequently Asked Questions of how to build a atmospheric water generator
What is the easiest way to start building an AWG?
Start with a Peltier-module demo. It’s low-cost and safe, and it shows core condensation ideas. Then scale up to a compressor system once you understand airflow and collection.
Do I need special tools to build an AWG?
Basic tools like a drill, pliers, soldering iron, and insulating tape are enough for small builds. For refrigerant systems you need certified tools and training, and it’s safer to buy a pre-made coil kit.
How much power will a homemade AWG use?
Power use depends on design. Small Peltier units can draw hundreds of watts, while efficient compressor systems can use 300–800 watts for 10 liters per day in humid climates.
Can AWG water be used for drinking and cooking?
Yes, if you add proper filtration and disinfection. Test TDS and microbial counts before using the water for drinking.
Is building a large AWG cost-effective?
Large AWGs have high upfront and operating costs. They can be cost-effective in water-scarce, energy-abundant areas or when paired with cheap renewable power.
How often should I clean the coil and filters?
Clean the coil monthly in dusty areas and change sediment and carbon filters every 3–6 months. UV lamps typically last 9–12 months and should be replaced per manufacturer guidelines.
Conclusion
Building an AWG is a practical blend of heat transfer, airflow design, and simple water treatment. You can start small with a Peltier demo and step up to a compressor-based unit as you learn. Focus on safe electrical work, good filtration, and real-world testing.
Try a small prototype, log performance, and improve one change at a time. Share your results, ask questions, or subscribe for updates if you want step-by-step plans and parts lists.