
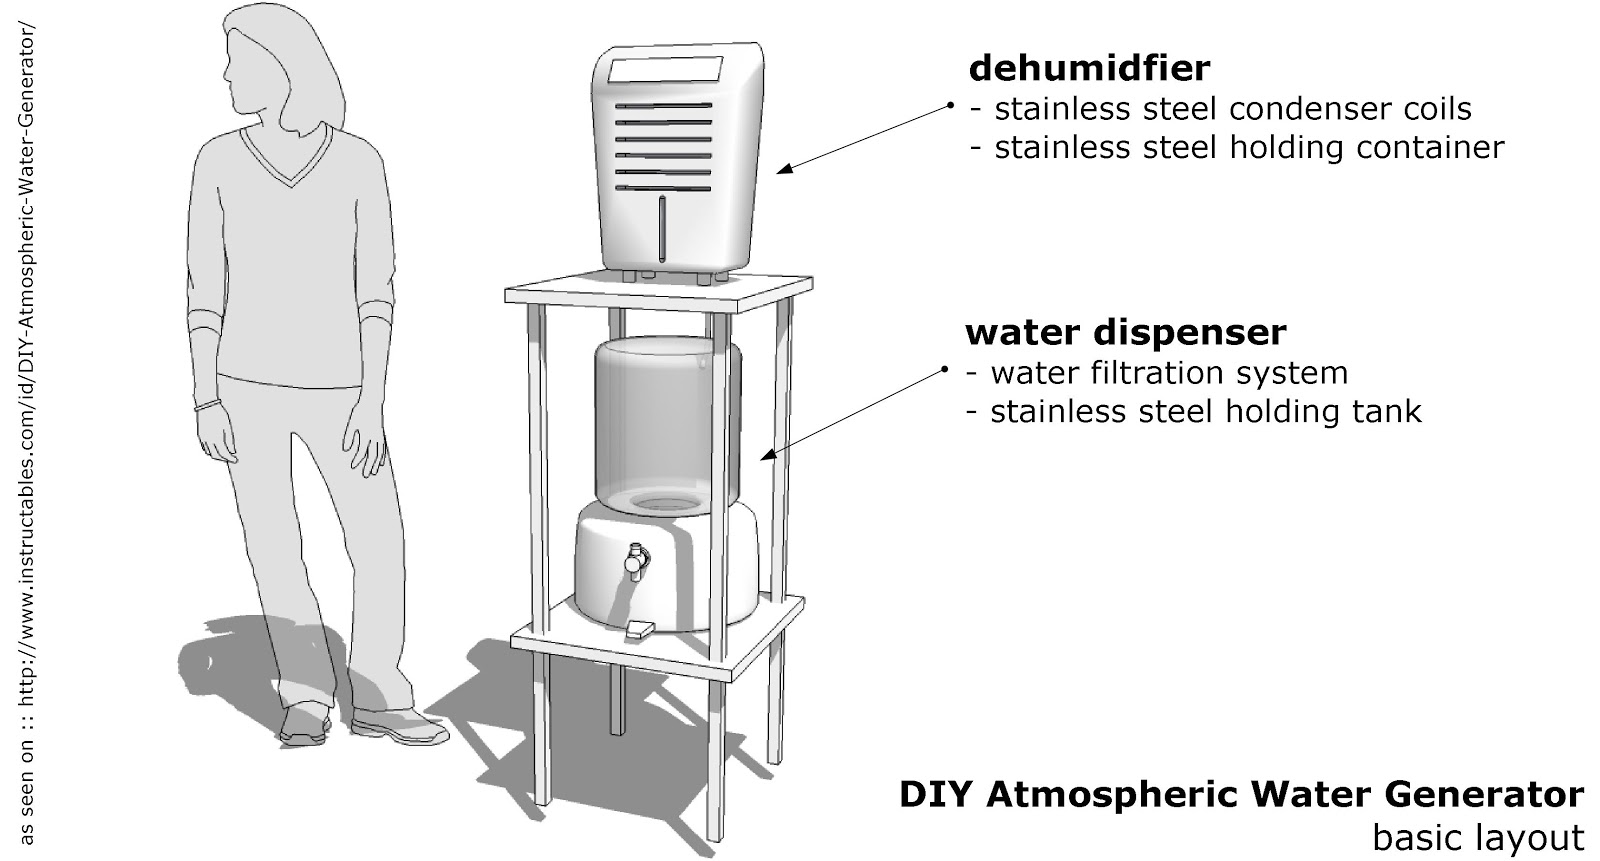
Build a simple atmospheric water generator using a cooled coil or desiccant and a small fan; expect modest yields.
I have built and tested several small units and led projects that scaled the idea up. This guide shows you how to build an atmospheric water generator step by step. You will learn the core methods, parts, safety, costs, and realistic yields. I write as an engineer and hands-on DIYer. Read on to build a safe, working unit and avoid common mistakes.

How atmospheric water generators work
An atmospheric water generator pulls moisture from air and turns it into liquid. Most small DIY units do this by cooling air below its dew point. Other designs use desiccants that absorb water and release it when heated.
Key concepts to know:
- Dew point: the air temperature at which vapor becomes liquid.
- Relative humidity: how much water is in the air, shown as a percent.
- Condensation: water forms on cold surfaces when air cools below its dew point.
Two common approaches:
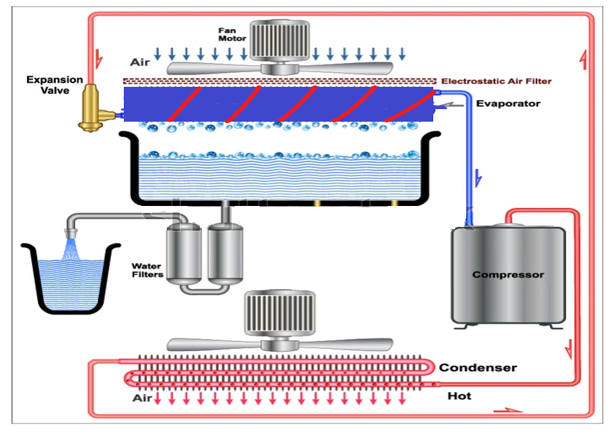
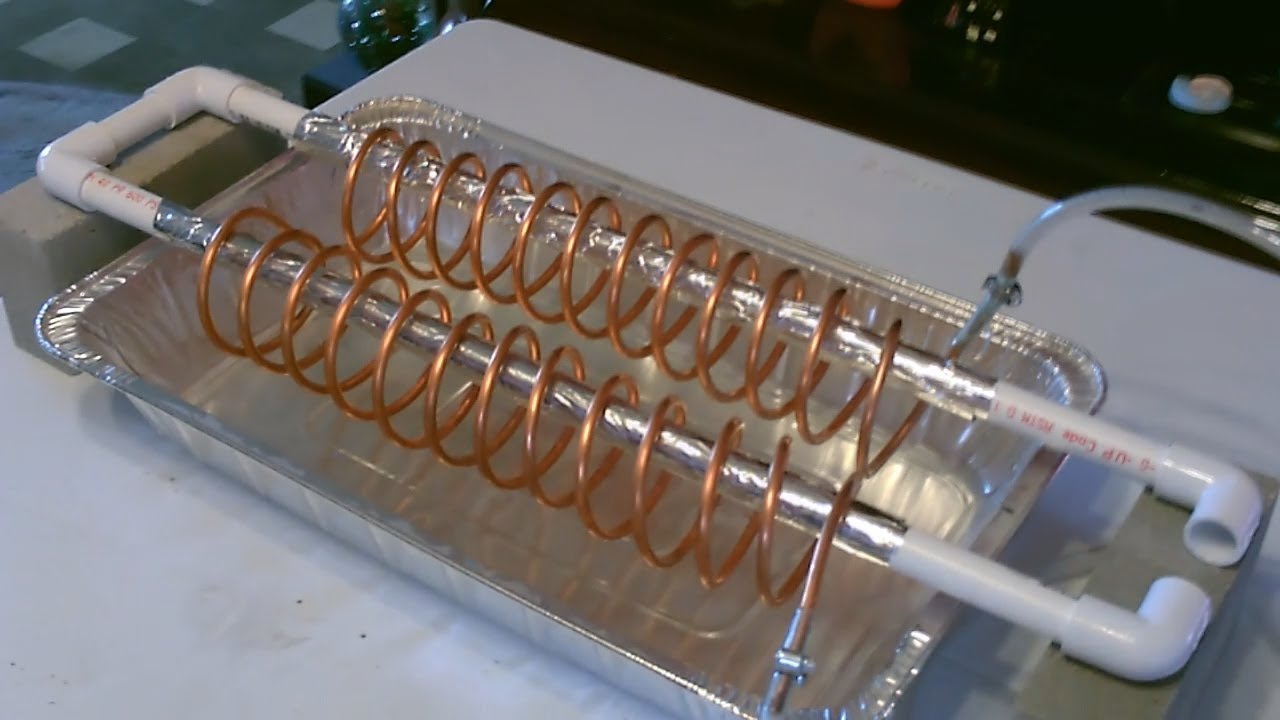
- Cooling (refrigeration or Peltier): Air flows across a cold coil. Water condenses on the coil and drips into a tray.
- Desiccant: A material captures humidity. Heat the desiccant to release water. Collect and condense the vapor.
From my tests, cooling coils work well in warm, humid places. Desiccant units are better in drier, cooler climates. Both need filtration and sanitizing to make safe drinking water.
Materials and tools needed
Get quality parts to save time and to stay safe. Below is a practical list for a basic cooling-based unit.
Parts
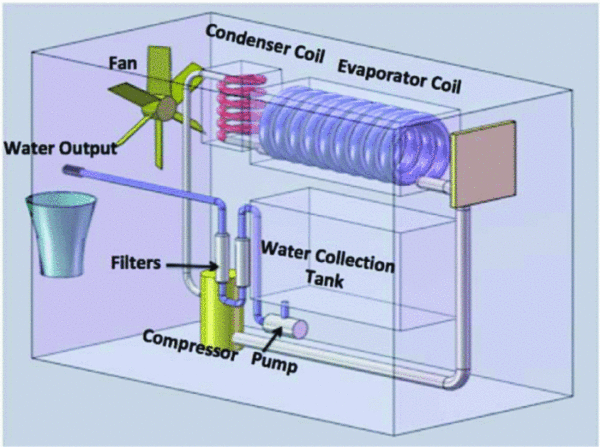
- Refrigeration coil or aluminum coil from an old AC unit. Clean and leak-free.
- Small compressor or Peltier modules for small builds.
- Fan sized for steady airflow over the coil.
- Water collection tray and tubing.
- Pre-filter and post-filtration (sediment filter and activated carbon).
- UV-C lamp or small UV sterilizer module for water safety.
- Power supply and fuses sized for the compressor or Peltier modules.
- Temperature and humidity sensor for monitoring.
Tools
- Wire stripper and crimper.
- Multimeter.
- Drill and saw for enclosures.
- Silicone sealant and food-safe tubing.
- Protective gear: gloves and eye protection.
Safety and quality notes
- Use food-safe parts where water contacts surfaces.
- Ensure electrical work meets local codes.
- Include a float switch or overflow protection for the collection tank.

Step-by-step guide to build a basic AWG (cooling coil method)
This step-by-step uses a small compressor and coil. Each step is short and clear.
Preparation
- Select a safe enclosure. It should allow airflow and be weatherproof if used outside.
- Inspect the coil and compressor. No leaks. No oil on coil surfaces.
Assembly
- Mount the coil in the enclosure so air passes over it.
- Install the fan to draw air through the coil. Aim for even airflow.
- Place a sloped collection tray under the coil. Add tubing to drain to a tank.
- Install a pre-filter at the air intake to block dust and insects.
- Fit a sediment filter and activated carbon inline before the storage tank.
- Add a UV-C sterilizer after the filters to disinfect the water.
- Wire the compressor, fan, sensors, and power supply. Use a fused connection and a switch.
- Add a float switch in the tank to stop the compressor when full.
Testing and calibration
- Power up and watch for condensation. Check for leaks.
- Measure the humidity and temperature. Record liters per day.
- Adjust fan speed and coil exposure to improve output.
Maintenance routine
- Clean filters every 2–4 weeks.
- Sanitize the storage tank monthly.
- Replace carbon filter every 3–6 months.
- Check coil for mold or scale regularly.
Tips from my builds
- Use sloped trays to avoid pooling. Pooling invites bacteria.
- Start with a small compressor for safety and scale up once the design proves itself.
- Use sensors to log data. You will learn what conditions give the best yield.

Design variations and improvements
You can improve a base AWG for efficiency or specific climates. Here are common variations.
Peltier-based units
- Use thermoelectric coolers for small, quiet systems.
- Best for desktop or camping units with low yields.
Solar-powered AWG
- Pair with solar panels and a battery bank.
- Works well where grid power is unavailable.
Desiccant-based units
- Use silica gel or salt blends to capture moisture.
- Regenerate desiccant with waste heat or solar thermal.
Hybrid systems
- Combine desiccant capture with a condenser to boost yield.
- Use waste heat from other devices to regenerate materials.
Scale-up tips
- Use larger coils and industrial compressors for liters-per-hour output.
- Add heat recovery to reduce energy use.
- Monitor water quality when scaling. Bigger systems need stricter treatment.
Trade-offs
- Cooling systems need steady power. They work best where humidity and temp are high.
- Desiccant systems can run on low energy but need an efficient regeneration step.
Performance, yields, and factors affecting output
How much water you get depends on simple physics and local weather.
Key factors
- Temperature: higher air temp holds more water. Condensation is easier when coil is cold.
- Relative humidity: yields spike above 50% RH. Best yields >60% RH.
- Airflow: more air over the coil increases capture. But fans use power.
- Coil surface area and temp difference: more area and colder coil give more water.
Typical yields
- Small Peltier units: tens to hundreds of milliliters per day.
- Small compressor-based DIY units: 0.5 to 5 liters per day in good conditions.
- Scaled systems: 5 to 100+ liters per day depending on size and climate.
Energy use
- Compressor systems use more power but give better yields.
- Measure watts per liter to compare designs.
Practical example
- I ran a compressor unit in humid summer conditions. It produced about 3 liters per day at 28°C and 70% RH. The same unit fell to under 1 liter per day at 20°C and 50% RH.
PAA-style questions
Q: Will an AWG work indoors?
A: Yes. It will reduce indoor humidity slightly and provide water, but yields depend on room conditions and ventilation.
Q: How much power does a typical small AWG need?
A: Small compressor units often need 200–800 watts. Peltier systems use less but yield far less water.
Safety, maintenance, and water quality
Treat AWG water like any collected water. Clean systems prevent illness.
Water treatment steps
- Use a sediment filter to remove dust and particles.
- Add an activated carbon filter to reduce odors and organics.
- Use UV-C or chemical disinfection to kill microbes.
- Optionally, add a remineralization cartridge to improve taste.
Maintenance checklist
- Replace pre-filter every month or as needed.
- Clean coil and tray monthly to remove biofilm.
- Sanitize tank with food-grade disinfectant monthly.
- Test water periodically for bacteria and metals.
Safety precautions
- Ensure electrical components are isolated from water.
- Use ground-fault protection on outdoor units.
- Label and lock enclosures to prevent tampering.
Limits and risks
- AWGs do not remove airborne volatile chemicals unless filtered out.
- Heavy metals from urban air are rare but possible. Test if you are near industry.
- In very low humidity, yields may be negligible and not worth the cost.

Costs, scalability, and practical considerations
Budget and goals guide your design choices.
Cost factors
- Small DIY unit with used parts: $100–$400.
- Mid-range off-grid solar AWG: $1,000–$5,000.
- Commercial, high-output systems: $10,000+.
Scaling tips
- Use modular design to add more coils and compressors later.
- Track cost per liter to decide on scaling.
- Consider local water availability. AWGs are best where water is scarce but humidity is moderate.
Environmental impact
- Energy use matters. Use renewable power to cut emissions.
- Proper maintenance reduces waste and extends life.
Decide if an AWG is right for you
- Good fit if you have high humidity, limited access to clean water, and moderate energy resources.
- Not ideal in dry or very cold climates unless you use efficient desiccant systems.
Frequently Asked Questions of how to build an atmospheric water generator
How much water can I expect from a DIY atmospheric water generator?
A small DIY compressor unit often yields 0.5 to 5 liters per day in warm, humid conditions. Yields vary greatly with temperature and humidity.
Is the water safe to drink straight from an AWG?
Water from an AWG needs filtration and disinfection. Use sediment and carbon filters plus UV or chemical treatment to make it safe.
Can I power an AWG with solar panels?
Yes. Pair solar panels and a battery bank to run compressors or fans. Size the panels to match peak power use and local sun hours.
Which method is best: cooling coil or desiccant?
Cooling coil systems work best in hot, humid areas. Desiccant systems help in drier climates. Choose based on local weather and energy availability.
How often do I need to clean an AWG?
Clean filters monthly and sanitize the water tank each month. Inspect coils and trays monthly to prevent buildup.
Do I need permits to build or operate an AWG?
Regulations vary. Small private units rarely need permits, but commercial systems may. Check local water and building codes.
Can I use recycled parts from air conditioners?
Yes, reused coils and compressors can work if they are leak-free and cleaned. Inspect and test carefully before use.
Conclusion
Building an atmospheric water generator is a practical way to create water from air. The key is to match your design to local humidity and power limits. Start small. Test and log yields. Clean and filter water for safety. From my experience, a careful DIY build with good sensors and filtration gives reliable results and useful lessons.
Try one small prototype. Learn what works in your climate. Share your data, and improve the design. If you found this guide helpful, subscribe, ask questions below, or try building a simple test unit this weekend.