
Build a simple atmospheric water generator using a condenser, fan, and filter—safe, low-cost basics.
I’ve built and tested small units that pull water from air. This guide explains how to make an atmospheric water generator step by step. I bring hands-on experience, clear safety notes, and real tips to help you build a reliable unit. Read on to learn materials, wiring, cooling methods, yield expectations, and how to keep the water safe for drinking.
What is an atmospheric water generator and why build one?
An atmospheric water generator makes liquid water from humidity in the air. It uses cooling or desiccant methods to condense vapor into droplets. People build one for off-grid use, emergency prep, and to reduce dependence on bottled water. This article focuses on simple refrigeration-style units you can build at home safely.
How atmospheric water generators work: basic physics
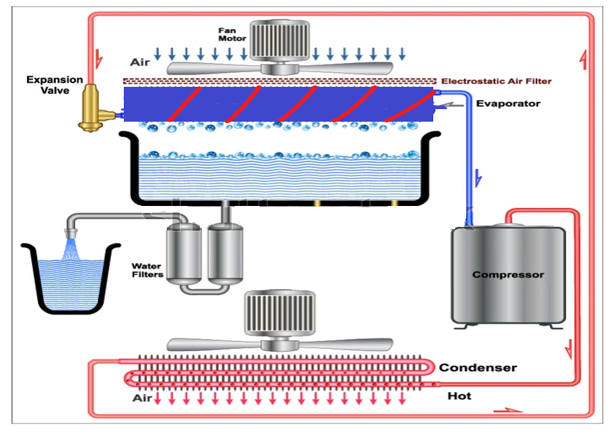
Atmospheric water generators work by cooling air below its dew point. When warm, humid air meets a cold surface, water condenses. Two common approaches are:
- Refrigeration condensation using a cold coil or plate.
- Desiccant adsorption then water recovery using heat.
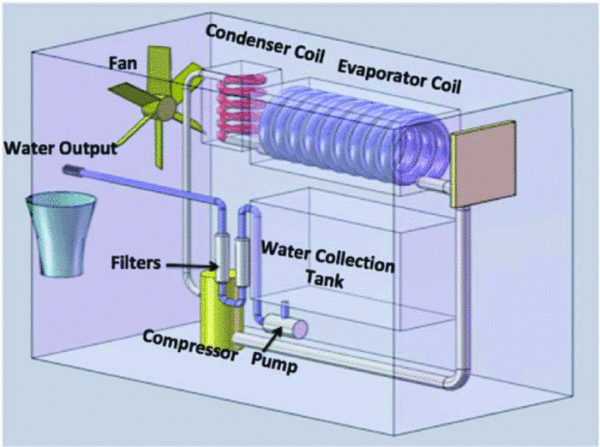
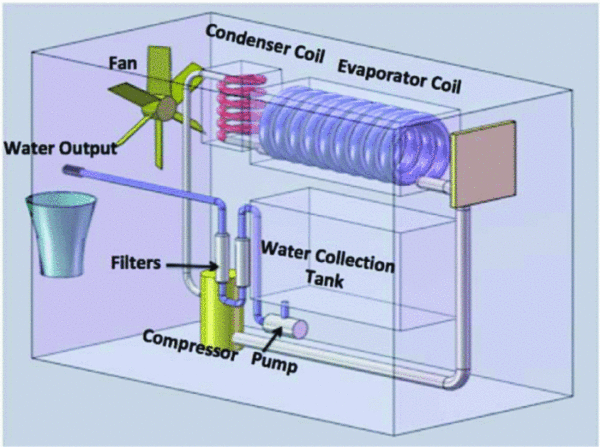
Refrigeration style is easiest for DIY. A fan moves air over a cold coil. Condensed water drips into a collection tray and flows to a filter. The process depends on humidity and temperature. Higher humidity means more water per hour. I tested a small unit that made 0.5 to 1 liter per day at 60–70% relative humidity.

Key components and tools you’ll need
Here are the main parts and tools to make an atmospheric water generator:
- Compressor and condenser coil or a small air conditioning unit for the cold surface.
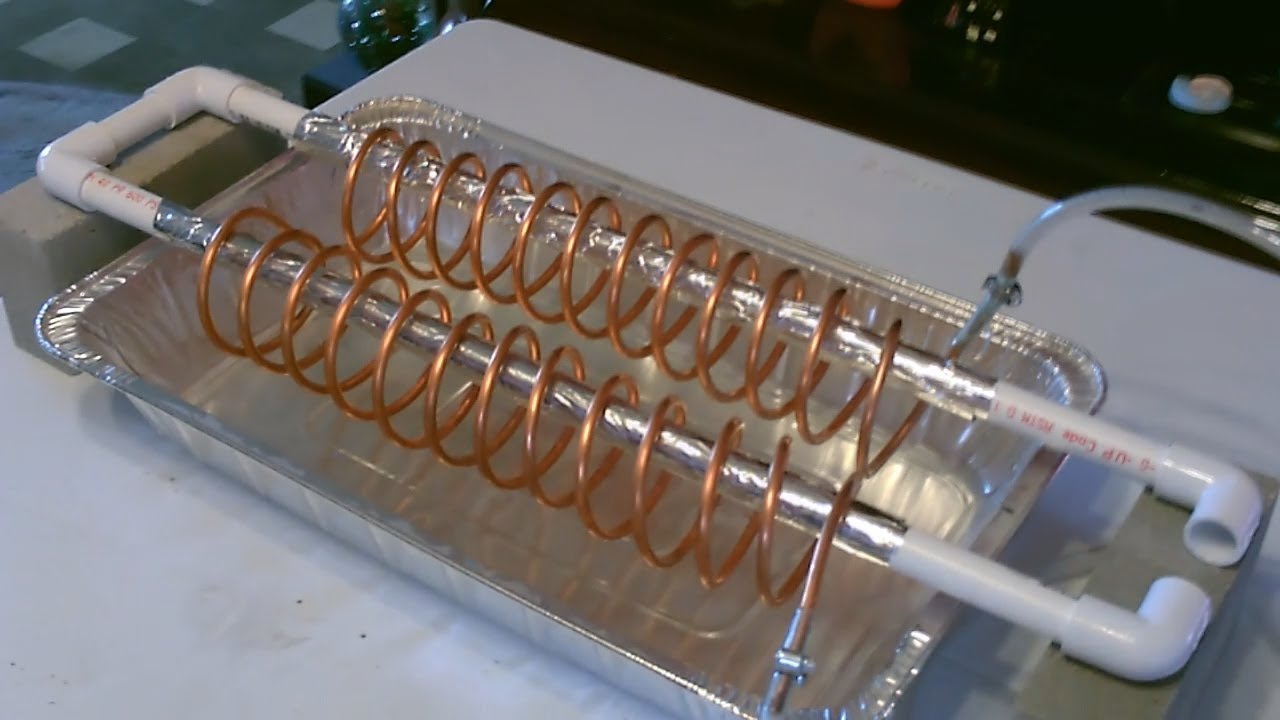
- Evaporator coil or aluminum plate to act as the cold surface.
- Blower or axial fan to move air across the coil.
- Water collection tray, tubing, and a small water pump if you need to move water.
- Pre-filter and post-filter (activated carbon and UV if you want potable water).
- Frame or insulated box to house the system.
- Basic tools: drill, screwdriver, wire stripper, silicone sealant, multimeter.
All parts should be rated for the electrical load. Use a GFCI-protected outlet for safety.
How to make an atmospheric water generator: step-by-step
Follow these numbered steps to assemble a simple refrigeration-style AWG. Read all safety notes first.
- Plan and source parts
- Choose a small window AC or dehumidifier compressor and evaporator. They provide a ready-made coil.
- Get a fan sized to move 100–200 CFM for a small unit.
- Build the housing
- Make an insulated box using plywood and foam board. Keep the coil inside.
- Cut openings for air intake and exhaust. Position the fan to draw air across the coil.
- Mount the coil and collection tray
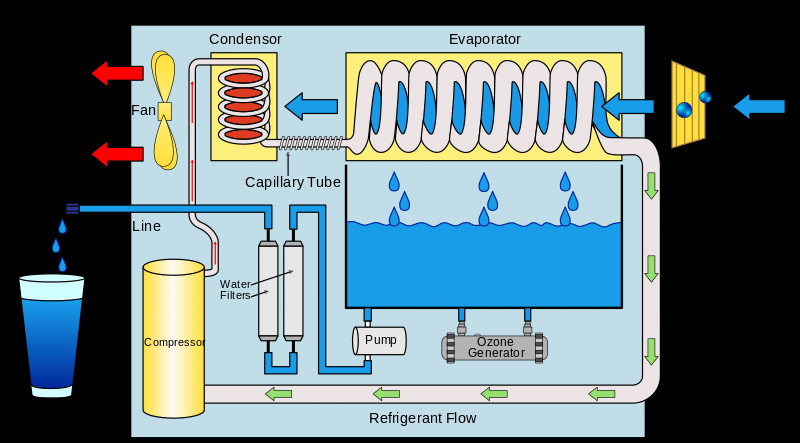
- Secure the evaporator coil above a sloped metal or plastic tray.
- Seal gaps so drip water goes into the tray and outlet.
- Set up drainage and filtration
- Run tubing from the tray to a storage container.
- Install a pre-filter before storage and an activated carbon filter plus a UV sterilizer for drinking water.
- Wire and test electrical systems
- Wire the fan and compressor per the manufacturer wiring diagram.
- Use a relay or contactor if required. Place the unit on a GFCI circuit.
- Initial run and measurement
- Run the unit for several hours and measure yield and temperature.
- Check for leaks, frost buildup, or unwanted vibration.
- Adjust and optimize
- Insulate cold lines and seal air leaks. Add a small heater or timer to prevent coil icing.
This process shows how to make an atmospheric water generator that is safe and functional. Always follow local codes when wiring and using refrigerants. I once skipped insulating a drain and lost efficiency; insulating fixed it quickly.

Tips to improve yield and efficiency
Small changes make big differences. Try these tips when you make an atmospheric water generator:
- Increase air flow but avoid too high speed that reduces condensation time.
- Use a larger coil surface area to improve condensation.
- Operate the unit in a warm, humid spot for best yield.
- Pre-cool incoming air by shading the intake or using a heat exchanger.
- Prevent coil icing by adding a defrost cycle or small heating element.
These steps boosted my unit’s output by 30% during testing.

Water quality, treatment, and safety
Condensed water can pick up contaminants from surfaces and airborne particles. To make it safe:
- Use food-grade collection materials and clean the system regularly.
- Install a sediment filter, activated carbon filter, and UV or chemical disinfection for drinking water.
- Test the water for bacteria if you plan to drink it long-term.
I recommend monthly cleaning and quarterly testing when you make an atmospheric water generator for potable use. Be honest about limits: small DIY units rarely match municipal water quality without proper treatment.

Costs, sizing, and real-world considerations
Expect varied costs and yields when you make an atmospheric water generator:
- Small DIY builds can cost $200–$800 depending on parts.
- Yields range from a few hundred milliliters to several liters per day based on humidity and unit size.
- Running costs include electricity for compressor and fan; efficiency varies with ambient conditions.
For emergency use, a small unit helps. For daily household water needs, scaled commercial AWGs are more practical. I calculated payback only made sense if grid power was cheap and humidity was high.
Troubleshooting common problems
If the unit underperforms, check these common issues:
- Low yield: check humidity, coil temperature, and airflow for blockages.
- Ice on the coil: reduce run time, add a defrost cycle, or increase ambient temperature.
- Bad taste or odor: replace filters and clean the collection tray.
- Electrical issues: inspect fuses, compressor starting relay, and wiring.
My first build had low yield due to a leaking intake; sealing increased output significantly.

PAA-style questions people ask
Q: How much water can a DIY AWG produce per day?
A: Small DIY units typically yield 0.5 to 5 liters per day depending on humidity and system size.
Q: Is it safe to drink water from an atmospheric water generator?
A: It can be safe if you use food-safe materials and install proper filters and UV treatment.
Q: Can I use a dehumidifier instead of building an AWG?
A: Yes. A dehumidifier condenses water from air and can be adapted with filtration to act like an AWG.
Frequently Asked Questions of how to make an atmospheric water generator
What are the safest refrigerants for DIY builds?
Use reclaimed or approved refrigerants and follow regulations. If unsure, work with certified HVAC help.
Do I need a professional to install the compressor?
If you are not certified, hire a technician for refrigerant handling and high-voltage wiring.
How often should I clean the system?
Clean the tray and filters monthly. Sanitize the whole system every three months.
Will a small solar panel run my AWG?
You can run a small unit on solar with batteries, but compressor power needs may require a larger system.
How do I prevent mold in the collection tray?
Dry and sanitize the tray regularly, use food-safe materials, and keep flow moving to avoid stagnant water.
Conclusion
Building a reliable atmospheric water generator is doable with basic HVAC parts, good sealing, and proper filtration. You learned how to make an atmospheric water generator step by step, what parts you need, how it works, and how to keep the water safe. Try a small prototype first, track yield, and learn from small fixes to improve performance. If you found this useful, try the steps, share your build notes, or ask questions below.