
Are you looking for a practical and fun project that can power your devices? Imagine creating your own generator using a DC motor right at home!
This guide will walk you through the simple steps to build a generator that can generate electricity for small gadgets or even lights. You don’t need to be an expert; just a bit of curiosity and some basic materials. By the end of this article, you’ll have the knowledge to impress your friends and family with your DIY skills.
Ready to turn your ideas into energy? Let’s get started!
Gather Necessary Materials
To build a generator with a DC motor, you need some materials. Gathering everything before starting helps make the process smoother. Here’s a list of what you will need.
Dc Motor
A DC motor is the heart of your generator. Choose a motor that fits your project. A small motor works well for simple tasks.
Power Source
You will need a power source to run the motor. A battery can be a good option. Make sure it matches the motor’s voltage requirements.
Wires
Wires connect all parts together. Use insulated copper wires for safety. Ensure you have enough length to reach all components.
Multimeter
A multimeter helps measure voltage and current. This tool is essential for testing your generator. It ensures everything works correctly.
Load Resistor
A load resistor is useful for controlling the output. It prevents damage to the motor. Choose a resistor that matches your motor’s specifications.
Base Or Mounting Board
A base keeps everything stable. Use wood or plastic for your mounting board. Ensure it is strong enough to hold the motor and other components.
Switch
A switch allows you to control the flow of electricity. Use a simple toggle switch for ease of use. It helps turn the generator on and off.
Tools
You will need basic tools for assembly. A screwdriver, pliers, and scissors will suffice. These tools help you put everything together easily.

Credit: www.youtube.com
Choose The Right Dc Motor
Choosing the right DC motor is key for your generator project. The motor determines how well your generator will work. Several factors affect your choice. Consider voltage, size, and type.
Understand Voltage Requirements
DC motors come in different voltage ratings. Common voltages are 6V, 12V, and 24V. Select a motor that matches your power needs. Higher voltage motors can produce more power. Make sure your power source can supply the required voltage.
Consider Motor Size
Motor size affects portability and ease of use. Smaller motors are easier to handle. Larger motors may generate more power. Think about where you will use the generator. Choose a size that fits your space and needs.
Choose The Right Type Of Motor
There are two main types of DC motors: brushed and brushless. Brushed motors are simpler and cheaper. They are good for basic projects. Brushless motors are more efficient and last longer. They are ideal for high-performance needs.
Check The Rpm Rating
RPM stands for revolutions per minute. It indicates how fast the motor spins. Higher RPM means more electricity generated. Choose a motor with an appropriate RPM for your project. Match it with your desired output.
Look For Availability And Cost
Find a motor that is easy to buy. Check local stores and online shops. Compare prices to find a good deal. Avoid spending too much on a motor. A reasonable price helps keep your project budget-friendly.
Prepare The Dc Motor
Preparing a DC motor is the first step in creating a generator at home. Gather your materials, including a DC motor, wires, and a load. Make sure to connect everything correctly for a successful setup. This simple project can help you understand how generators work.
Preparing the DC motor is a crucial step in building your own generator at home. A well-prepared motor can significantly enhance the efficiency and output of your DIY project. Below, you’ll find practical steps to ensure your DC motor is ready for action.
Inspect The Motor
Start with a thorough inspection of the DC motor. Look for any visible signs of damage, such as cracks in the casing or frayed wires. Make sure the rotor spins freely. A stuck rotor can hinder performance and reduce the generator’s output. If you notice any rust, clean it off gently using a soft cloth. This simple maintenance can improve the motor’s longevity and efficiency.
Attach Wires For Output
Next, you need to attach wires for output. Begin by selecting two insulated wires. The length can vary, but aim for at least 2 to 3 feet to allow for flexibility in your setup. Strip both ends of the wires to expose about half an inch of copper. This will ensure a good connection. Connect one wire to the positive terminal of the motor and the other to the negative terminal. Make sure the connections are tight to prevent any loss of energy during operation. Once attached, consider using electrical tape to secure the connections. This helps in avoiding any accidental disconnections while you work on your generator. Are you ready to see your DC motor turn into a functional generator?
Build The Rotor Setup
The rotor setup is key for your generator. It helps convert mechanical energy into electrical energy. Building this part requires careful steps. Let’s explore how to create a spinning mechanism and secure the motor.
Create A Spinning Mechanism
Start with a sturdy base. Use wood or metal for stability. Attach a round disk to the base. This will be your rotor. Ensure the disk can spin freely. You can use a bicycle wheel or a similar item.
Next, connect a shaft to the disk. This shaft will hold the DC motor. Make sure it fits snugly. It should not wobble during rotation. Use bearings to reduce friction. This will help the rotor spin smoothly.
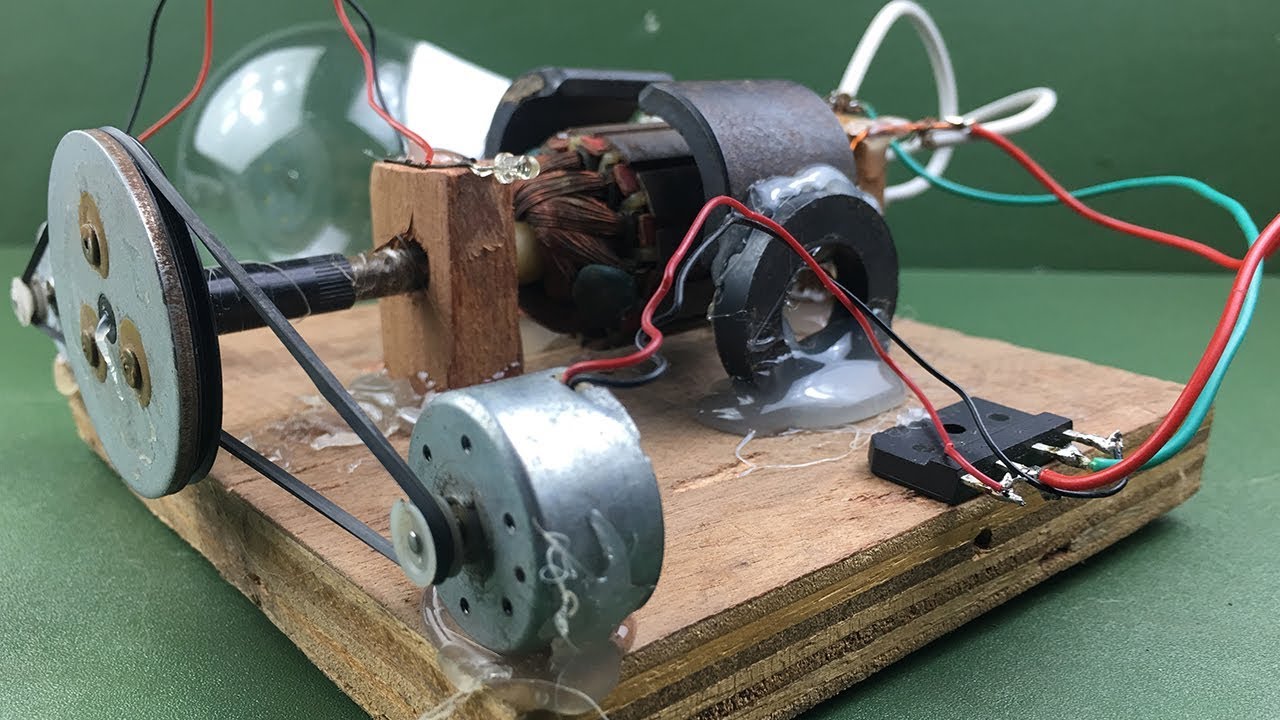
Finally, connect a belt or pulley system. This will link the rotor to the motor. Adjust the tension of the belt. It should be tight but not too tight. This setup will help in generating power effectively.
Secure The Motor
Now, it’s time to secure the motor. Place the DC motor on the base. Align it with the spinning mechanism. Use screws or brackets for stability. Ensure it is firmly attached.
Check the wiring of the motor. Make sure it is connected properly. This prevents any electrical issues. Test the motor by spinning the rotor. It should turn smoothly without any resistance.
Adjust the position if needed. The motor must align perfectly with the rotor. This ensures efficient power generation. A well-secured motor is essential for your generator to work.
Connect The Electrical Components
Connecting the electrical components is key for building a generator with a DC motor at home. Start by linking the motor to a power source. Ensure all wires are secure for smooth operation. This simple setup can provide electricity for small devices.
Connecting the electrical components is a crucial step in making a generator with a DC motor at home. This process ensures that all parts work harmoniously, allowing you to generate electricity effectively. Let’s dive into how to set up your circuit and add a voltage regulator, which is essential for stabilizing the voltage output.
Set Up The Circuit
Begin by gathering all necessary components: a DC motor, a diode, a switch, connecting wires, and a battery. 1. Connect the DC Motor: Start with the terminals of your DC motor. Connect one terminal to the positive terminal of your battery. 2. Add the Diode: The diode is crucial for preventing backflow of current. Connect the anode (the end without the stripe) to the battery’s negative terminal and the cathode (the end with the stripe) to the other terminal of the DC motor. 3. Include the Switch: Place the switch in line with the motor. This will allow you to control the flow of electricity easily. Double-check all your connections to avoid any short circuits. This setup is where the magic begins. Have you ever thought about how simple components can create power?
Add Voltage Regulator
Adding a voltage regulator stabilizes the voltage output from your generator. This is important because fluctuating voltage can damage connected devices. 1. Choose the Right Voltage Regulator: Select a regulator that suits the voltage output of your motor. A common choice is the LM7805 for lower voltage applications. 2. Connect the Regulator: Attach the input of the voltage regulator to the output of your diode. Then, connect the output of the regulator to your desired load or battery for charging. 3. Test the Setup: With everything connected, flip the switch to start the generator. Use a multimeter to check the voltage output. Seeing the needle move can be incredibly satisfying. Have you ever considered how much power you can generate with just a few components?
With your circuit set up and the voltage regulator in place, you’re on your way to producing your own electricity at home. Embrace this hands-on experience and enjoy the process of learning about the flow of energy!
Test The Generator
Building a generator with a DC motor at home is simple and fun. Gather a few materials and follow easy steps to create your own power source. This project is great for learning about electricity and motors while being hands-on.
Testing your homemade generator is a crucial step. It ensures that your efforts in building it have paid off. You’ll want to verify that it produces the expected voltage and operates smoothly.
Check Voltage Output
To check the voltage output, you’ll need a multimeter. Set it to the appropriate voltage setting, usually at 20V DC for most small generators. 1. Connect the Multimeter: Attach the red probe to the positive output terminal of your generator and the black probe to the negative terminal. 2. Start the Generator: If you’ve built a hand-crank generator, start cranking it. For a wind or water generator, ensure it’s exposed to the elements. 3. Read the Voltage: Observe the reading on the multimeter. Ideally, you want to see a steady voltage that meets your expectations. If the voltage is significantly lower than anticipated, don’t panic. This could be due to several factors, such as the speed of rotation or connections.
Troubleshoot Issues
If you encounter problems, troubleshooting is key. Start by checking all your connections. Loose or corroded wires can lead to poor performance. – Inspect the Motor: Ensure the DC motor spins freely. Any obstruction will affect output. – Examine the Load: If you’re connecting devices to the generator, ensure they are compatible. Overloading can cause the generator to struggle. – Test Different Speeds: Sometimes, adjusting the speed at which you turn the generator can improve voltage output. Reflect on the process. Did you encounter unexpected challenges? Each problem presents an opportunity to learn and improve your setup. Testing your generator is not just a formality; it’s a chance to verify your hard work and creativity. Embrace the journey, and remember that every tweak brings you closer to a reliable energy source.
Enhance Efficiency
Build a generator with a DC motor at home to enhance efficiency. This project helps you understand electricity and mechanics. Simple steps guide you through the process, making it an enjoyable and educational experience. Perfect for DIY enthusiasts and beginners alike.
Enhancing the efficiency of a generator built from a DC motor is crucial for maximizing its output and ensuring it runs smoothly. This involves making adjustments and improvements that can lead to significant benefits. You can achieve better performance with a few simple strategies. Let’s take a closer look at how to optimize rotor speed and reduce energy loss.
Optimize Rotor Speed
The rotor speed is vital for generating power. A higher rotor speed often results in increased voltage output. – Experiment with Gear Ratios: Adjusting the gears connected to the rotor can help. A smaller gear on the motor can lead to a higher speed on the rotor, generating more electricity. – Use Lightweight Materials: If you’re building your rotor, consider using materials that are both strong and light. This can help the rotor spin faster, enhancing the overall output. – Monitor and Adjust RPM: Use a tachometer to monitor the rotor’s speed. Aim for an optimal speed range where the generator performs best. Making these adjustments can mean the difference between a barely functioning generator and one that produces ample power.
Reduce Energy Loss
Energy loss in a generator can seriously impact its efficiency. Identifying and addressing these losses can lead to better performance and longer lifespan. – Check Connections: Ensure that all electrical connections are tight and clean. Loose connections can lead to significant energy loss. – Minimize Friction: Use bearings that reduce friction in the rotor assembly. Less friction means less energy wasted, resulting in more electricity produced. – Insulate Wires: Use insulated wires to prevent energy loss through heat. This simple step can improve the efficiency of your generator. Every small adjustment counts. Have you ever noticed how a tiny change can lead to a big impact in performance? By focusing on these aspects, you will not only enhance your generator’s efficiency but also gain a deeper understanding of its workings.

Credit: www.facebook.com
Safety Tips
Creating a generator with a DC motor can be exciting. Safety is key during this process. Follow these tips to stay safe.
Wear Protective Gear
Always wear safety glasses. They protect your eyes from flying debris. Gloves are also important. They keep your hands safe from sharp edges.
Work In A Well-ventilated Area
Ensure your workspace has good air flow. This helps avoid inhaling fumes. Open windows or use fans for better ventilation.
Disconnect Power Sources
Before you start, unplug any devices. This prevents accidental shocks. Double-check all connections before touching wires.
Handle Tools With Care
Use tools properly to avoid injuries. Keep them clean and in good condition. Store tools safely after use.
Keep Flammable Materials Away
Store flammable items far from your workspace. Avoid sparks or heat sources nearby. This reduces fire risks.
Be Aware Of Electrical Safety
Understand basic electrical safety. Know how to use a multimeter. Do not touch exposed wires while powered.
Have A First Aid Kit Ready
Keep a first aid kit nearby. Be prepared for minor injuries. Know how to treat cuts or burns quickly.
Get Help If Needed
Do not hesitate to ask for help. A second pair of hands can be useful. Share your project with someone experienced.

Credit: www.pinterest.com
Frequently Asked Questions
How Can I Make A Generator At Home?
Making a generator at home is achievable with basic materials. You need a DC motor, a power source, and a load like a light bulb. Connect the motor to a shaft and spin it to generate electricity. Follow safety precautions when working with electrical components.
What Materials Do I Need For A Diy Generator?
To create a DIY generator, gather a DC motor, wires, a power source, and a load. You may also need a switch and a multimeter for measuring voltage. Most components can be found around your home or at local hardware stores.
Ensure all materials are compatible for best results.
Is It Safe To Build A Generator?
Building a generator can be safe if you follow guidelines. Always work in a dry area and wear safety gear. Ensure all connections are secure to avoid short circuits. If you’re unsure about any step, consult an expert or refer to reliable resources for guidance.
Can I Use Any Dc Motor For A Generator?
Not all DC motors are suitable for generator use. Choose a motor with a suitable voltage rating for your project. Small hobby motors work well for low-power applications. For higher output, consider using motors from discarded appliances. Always check the specifications before starting your project.
Conclusion
Building a generator with a DC motor at home is simple. You can create your own power source. This project helps you understand basic electrical concepts. It also encourages hands-on learning and creativity. Follow the steps carefully for the best results.
Don’t hesitate to experiment with different materials. You might find new ways to improve your generator. Enjoy the process and learn from any mistakes. Making your own generator can be fun and rewarding. Start your project today and see what you can create!