
When it comes to ensuring the reliability and efficiency of your generator, a thorough testing procedure is crucial. You want to avoid unexpected failures, especially during critical times.
That’s why understanding the generator testing procedure step by step can be a game changer for you. This guide will walk you through each stage, making it easy to follow and implement. By the end, you’ll feel confident and empowered to keep your generator in top shape, ensuring it performs when you need it most.
Don’t leave your power needs to chance—read on to discover how you can safeguard your energy supply with a straightforward testing process.
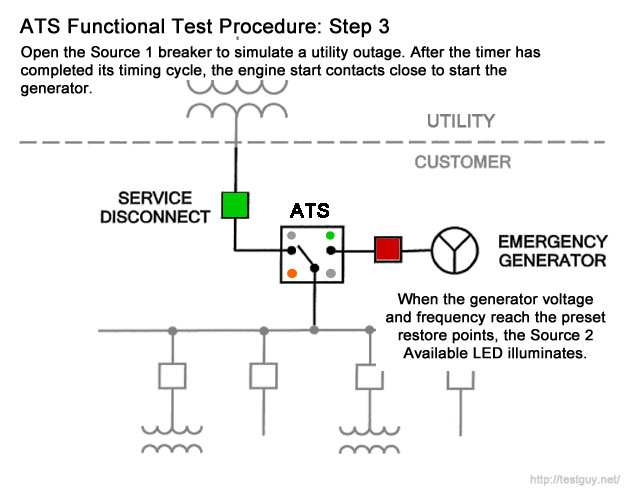
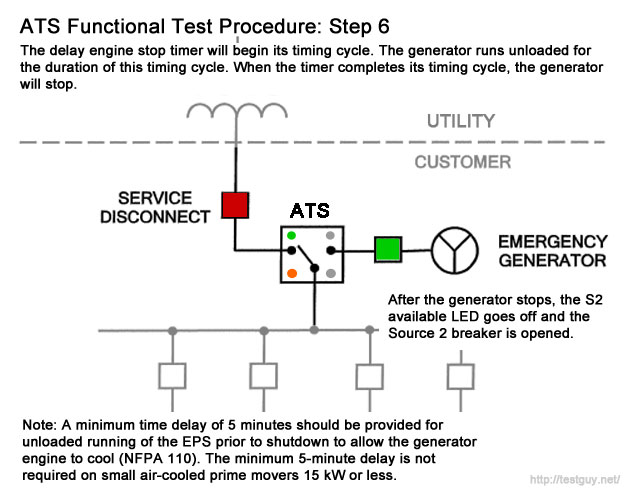
Credit: wiki.testguy.net
Safety Precautions
Generator testing is crucial for ensuring reliability and efficiency. However, safety must always come first. Before you begin, understanding the necessary safety precautions can prevent accidents and injuries.
Wear Personal Protective Equipment (ppe)
Always wear the appropriate personal protective equipment. This includes:
- Safety goggles:Protect your eyes from dust and debris.
- Gloves:Use insulated gloves to prevent electric shock.
- Ear protection:Generators can be loud, so protect your hearing.
Investing in good PPE can make a significant difference in your safety. You wouldn’t want to risk an injury that could have been easily avoided.
Ensure Proper Ventilation
Generators emit harmful fumes during operation. Always test your generator in a well-ventilated area. If you’re indoors, use exhaust fans or open windows to ensure fresh air circulation.
Have you ever felt lightheaded near a running generator? That’s a warning sign. Prioritize your health by ensuring proper ventilation.
Check For Fuel Leaks
Before starting the generator, inspect for any fuel leaks. This includes checking hoses and connections for cracks or damage.
Even a small leak can lead to a fire hazard. If you notice any signs of leakage, fix the issue before proceeding with your testing.
Keep A Fire Extinguisher Nearby
Always have a fire extinguisher within reach during generator testing. Make sure it’s rated for electrical fires.
Fires can start unexpectedly. Having an extinguisher nearby gives you peace of mind and can save lives.
Follow Manufacturer Guidelines
Each generator comes with a specific set of safety guidelines. Familiarize yourself with the manufacturer’s instructions before testing.
Neglecting these guidelines can lead to malfunctions or accidents. Your generator is a powerful machine; treat it with respect.
Stay Alert And Focused
Distractions can lead to dangerous situations. Stay focused on the task at hand during testing.
Turn off your phone and eliminate any potential distractions. Your attention could be the difference between a safe test and a hazardous incident.
Safety precautions are not just a checklist; they are essential steps to protect you and your surroundings. Are you ready to prioritize safety during your generator testing?
Pre-test Preparations
Preparing for generator testing is crucial for safety and accuracy. Proper steps ensure the generator runs well. Follow these simple steps to get ready.
Inspecting Generator Components
Begin by checking the generator’s external parts. Look for any visible damage. Inspect the fuel lines for leaks. Ensure the oil level is adequate. Check the coolant level as well.
Examine the battery connections. Make sure they are clean and tight. Inspect the air filter for dirt or blockages. A clean air filter helps performance. Finally, check the exhaust system for any cracks.
Gathering Necessary Tools
Collect all tools needed for testing. A multimeter is essential for checking electrical components. Use a wrench set for tightening bolts. A screwdriver set will help with any adjustments.
Have a fuel container ready, if refueling is needed. Keep a flashlight handy for dark areas. A first aid kit is also wise to have on-site.
Verifying Documentation
Check the generator’s manual before testing. Ensure you understand the specifications. Review previous test records for any issues. This can highlight patterns or recurring problems.
Make sure all safety protocols are in place. Verify that all necessary permits are available. Document any changes made during preparations.
Initial Visual Inspection
The initial visual inspection is a key step in generator testing. It helps ensure safety and proper functioning. A thorough check can reveal issues before testing begins. This step sets the stage for a successful generator test.
Checking Exterior Condition
Start by examining the generator’s exterior. Look for any signs of rust or damage. Check for loose parts or signs of wear. Ensure that the housing is intact. A clean and well-maintained exterior indicates good care.
Inspecting Connections And Wiring
Next, inspect all electrical connections. Look for frayed wires or corrosion. Ensure that all connections are tight and secure. Loose or damaged wires can cause serious problems. Fix any issues found during this inspection.
Ensuring Proper Grounding
Proper grounding is crucial for safety. Check the grounding connections to ensure they are secure. A well-grounded generator minimizes the risk of electrical shock. Make sure the grounding system meets local codes and standards.
Functional Checks
Functional checks are key to ensuring generators work properly. This step-by-step testing procedure helps identify any issues early on. Regular checks keep generators reliable and ready for use when needed.
Functional checks are crucial in ensuring that your generator operates smoothly and efficiently. These checks help identify any potential issues before they escalate into costly repairs or outages. By methodically testing each component, you can maintain the reliability of your generator and give yourself peace of mind.
Testing Control Panel Functions
Start by examining the control panel. This is your primary interface for monitoring the generator’s performance. – Check the Start/Stop Switch: Make sure that the switch operates smoothly and responds promptly. – Test the Voltage Output Display: Confirm that the display shows the correct voltage levels. An inaccurate reading can indicate underlying issues. – Review the Frequency Meter: Ensure that the frequency readings are stable. Fluctuations could hint at problems within the generator’s operation. A personal experience taught me the value of this step. Once, I skipped the control panel check and faced a malfunction during a power outage. Lesson learned: never underestimate the control panel’s significance.
Verifying Indicator Lights
Next, check the indicator lights on the control panel. These lights provide immediate feedback about the generator’s status. – Look for the Green Light: This indicates the generator is operational. If it’s off, investigate the cause. – Check Warning Lights: Pay attention to any yellow or red warning lights. These signals could point to low oil pressure or overheating. – Test the Alarm System: Ensure that alarm indicators function correctly. They can be lifesavers during emergencies. Have you ever wondered why some people ignore these lights? I once met a generator owner who had no clue his warning lights were malfunctioning. It’s a reminder to take every indication seriously.
Inspecting Circuit Breakers
Lastly, inspect the circuit breakers. These components protect your generator from overloads and short circuits. – Examine Each Breaker: Look for any tripped breakers. Reset them and observe if they trip again. – Check for Physical Damage: Inspect for cracks or signs of wear. Damaged breakers can lead to significant safety hazards. – Test Manual Operation: Manually flip each breaker to ensure they function properly. Ignoring circuit breaker checks can lead to system failures. I remember a time when a poorly maintained breaker caused my generator to fail during a storm. That experience reinforced the importance of regular inspections. Performing functional checks regularly not only ensures your generator is ready when you need it, but it also extends its lifespan. What steps will you take today to ensure your generator is in top shape?
Load Testing Procedures
Load testing procedures for generator testing involve a series of clear steps. Begin by preparing the generator and ensuring safety measures. Then, gradually increase the load while monitoring performance. Finally, record data to evaluate efficiency and reliability. This process helps ensure the generator operates correctly under different conditions.
Load testing procedures are essential for ensuring that your generator can handle the demands of real-world usage. This process not only verifies the generator’s reliability but also identifies potential issues before they become major problems. By simulating actual operating conditions, you can assess performance and make informed decisions about maintenance and operational strategies.
Simulating Load Conditions
To effectively simulate load conditions, first, determine the generator’s rated capacity. This is crucial for understanding how much load to apply during testing. You can use resistive loads, such as electric heaters or load banks, to mimic real-life scenarios. – Start by gradually increasing the load until you reach 75% of the generator’s capacity. – Hold this load for a set period, usually around 30 minutes. – Then, increase it to 100% and maintain that for another 30 minutes. This step helps you see how the generator responds under stress. Have you ever had a moment where you pushed a machine too hard? This testing is your chance to prevent that from happening with your generator.
Monitoring Performance Metrics
While the generator is under load, monitor key performance metrics. Pay close attention to parameters like temperature, pressure, and fuel consumption. Using a digital monitoring system can help streamline this process. – Take note of any fluctuations and assess whether they fall within acceptable limits. – Anomalies may indicate underlying problems that need addressing. Consider keeping a log of these metrics for future reference. This can be invaluable for spotting trends over time. Is your generator performing as expected, or are there signs that it may need maintenance soon?
Recording Voltage And Frequency
Recording voltage and frequency during load testing is critical. These metrics indicate whether your generator maintains stable output under varying loads. Use a multimeter or an oscilloscope to measure: – Voltage levels – Frequency deviations Ensure that voltage remains within the manufacturer’s specified range. If you notice significant fluctuations, it might suggest issues with the generator’s regulation system. Take a moment to reflect: have you ever ignored a small problem, only to have it escalate? Regularly recording these metrics can help you catch small issues before they become major headaches.
Load testing is a proactive approach to managing your generator’s performance. By simulating load conditions, monitoring performance metrics, and recording voltage and frequency, you can ensure your generator operates efficiently and reliably when you need it most.
Fuel System Inspection
Fuel system inspection is a key part of generator testing. It ensures that fuel flows properly and meets safety standards. Follow simple steps to check fuel lines, filters, and connections for any issues. Keeping the fuel system in good shape helps your generator run smoothly.
Fuel System Inspection is a critical part of generator testing. It ensures that your generator has the necessary fuel to operate efficiently and reliably. Neglecting this aspect can lead to costly breakdowns or even complete failure during emergencies. Let’s break down the key steps involved in inspecting the fuel system.
Checking Fuel Levels
Start by checking the fuel levels in your generator. Make sure you have enough fuel to run the generator for the desired duration. A common mistake is to underestimate how much fuel is needed, especially for prolonged outages. Tip: Always keep a reserve supply of fuel on hand. You never know when you might need it. Look for any signs of contamination in the fuel tank. Cloudiness or particles can indicate serious issues.
Inspecting Fuel Lines
Next, inspect the fuel lines for any signs of wear or damage. Cracks, leaks, or corrosion can lead to fuel loss and safety hazards. Carefully examine all connections and joints. Visual inspection is crucial here. You want to ensure that every inch of the line is in good shape. If you notice any issues, replace the damaged sections immediately. Doing this can save you from larger problems down the road.
Testing Fuel Pumps
The final step involves testing the fuel pumps. Fuel pumps are essential for delivering fuel to the engine efficiently. Start the generator and listen for a consistent humming sound. This indicates that the pump is functioning correctly. If you hear strange noises or if the pump does not engage, it may need repair or replacement. You can also check the fuel pressure using a gauge. Make sure it meets the manufacturer’s specifications. A simple pressure test can reveal underlying issues. Have you ever faced a situation where your generator failed because of overlooked fuel system problems? These inspections are vital to avoid such scenarios. A few minutes of checking can save you hours of headache later.
Cooling System Evaluation
The cooling system is vital for generator performance. It prevents overheating during operation. Evaluating it ensures your generator runs smoothly and efficiently.
Follow these steps to assess the cooling system properly. Each part plays a role in keeping the engine cool.
Inspecting Radiator And Hoses
Start by examining the radiator for any damage. Look for leaks, cracks, or corrosion. Check all hoses connected to the radiator. Ensure they are secure and not worn out.
Inspect the hose clamps. Tighten them if they are loose. Replace any hoses that show signs of wear. A damaged hose can lead to coolant loss.
Checking Coolant Levels
Next, check the coolant levels in the reservoir. Ensure the coolant is at the recommended level. If it is low, add the appropriate coolant type.
Look for any discoloration in the coolant. This could indicate contamination. Always use fresh coolant for the best results.
Testing Temperature Control Systems
Test the temperature gauge to ensure accuracy. Start the generator and observe the gauge reading. It should stay within the normal range.
Check the thermostat operation. It should open and close at the correct temperatures. A malfunctioning thermostat can cause overheating.
Lastly, inspect the cooling fans. They should run smoothly and efficiently. Proper airflow helps maintain optimal engine temperature.
Exhaust System Assessment
Assessing the exhaust system is vital for proper generator testing. Follow a clear step-by-step process to ensure accuracy. This method helps identify any issues and maintain optimal performance. Regular assessments keep your generator running smoothly and efficiently.
Assessing the exhaust system of your generator is crucial for maintaining its performance and safety. A well-functioning exhaust system ensures that harmful gases are expelled efficiently, preventing dangerous build-up. Let’s break down the essential steps for a thorough exhaust system assessment.
Inspecting Exhaust Pipes
Begin by visually inspecting the exhaust pipes for any signs of damage or corrosion. Look for cracks, rust spots, or any discoloration that could indicate wear. Use a flashlight to examine hard-to-reach areas. Pay attention to joints and connections, as these are common trouble spots. Regular inspection helps you catch issues early. This proactive approach can save you from costly repairs down the road.
Checking For Leaks
Next, check for leaks in the exhaust system. Start the generator and listen for unusual sounds, like hissing or sputtering. These noises can signal a leak. You can also use soapy water on the connections and joints. If you see bubbles forming, you have a leak that needs immediate attention. Ignoring leaks can lead to hazardous situations. Make it a habit to check for leaks regularly to ensure your safety and the efficiency of your generator.
Ensuring Proper Ventilation
Ventilation is key to a safe exhaust system. Make sure the area around the generator is clear and free of obstructions. Adequate airflow helps disperse exhaust gases quickly. Consider installing an exhaust extension if your generator is in a confined space. This helps direct harmful gases away from people and pets. Ask yourself: Is your generator’s exhaust setup maximizing safety? Taking these simple steps can make a significant difference in your generator’s operation.
Electrical System Testing
Electrical system testing is vital for generator performance. This process ensures all electrical components work correctly. It helps prevent problems during operation. Regular testing keeps your generator reliable and efficient.
Let’s break down the key steps in electrical system testing.
Inspecting Alternator Functionality
Start by checking the alternator for any signs of damage. Look for cracks or leaks. Ensure all connections are tight and secure. Use a multimeter to measure output voltage. It should match the generator’s specifications. Listen for unusual noises during operation. These could indicate internal issues.
Testing Voltage Regulators
Next, test the voltage regulators. These devices control the output voltage. A faulty regulator can cause voltage spikes. Use a multimeter to check the voltage levels. Ensure they stay within the recommended range. Inspect wiring for any signs of wear or damage. Replace any damaged parts immediately.
Verifying Battery Connections
Finally, verify the battery connections. Loose or corroded connections can lead to starting problems. Clean any corrosion from battery terminals. Ensure the connections are tight. Check the battery voltage with a multimeter. It should show a full charge. Replace old batteries to avoid failures.
Credit: wiki.testguy.net
Final Performance Review
The Final Performance Review is crucial for assessing generator function. This step ensures that the generator operates as intended. It confirms safety and efficiency before regular use.
This review involves careful analysis and testing. It helps identify any issues. The goal is to ensure the generator is fully operational.
Analyzing Test Results
Start by reviewing all test results. Look for patterns in the data. Pay attention to voltage, frequency, and load levels.
Compare the results with the manufacturer’s specifications. This helps to check if the generator meets required standards. Any deviations should be noted for further investigation.
Identifying Potential Issues
Next, identify any potential issues from the test results. Look for irregularities in performance metrics. Common concerns include overheating, unusual noises, or fluctuations in output.
Document these issues clearly. Prioritize them based on severity. This will guide necessary repairs or adjustments.
Confirming Operational Readiness
Finally, confirm the generator’s operational readiness. Conduct a final inspection to ensure all components are in good condition. Check fuel levels, oil quality, and battery status.
Run the generator under load for a short time. Observe its performance closely. Ensure it runs smoothly without any problems.
This final step ensures the generator is ready for use. A thorough performance review guarantees reliability and efficiency.
Credit: multiphase-corp.com
Frequently Asked Questions
What Is The Purpose Of Generator Testing?
Generator testing ensures the reliability and functionality of your generator. It helps identify potential issues before they lead to failures. Regular testing can enhance performance and lifespan. It also ensures compliance with safety standards and regulations, ultimately providing peace of mind during power outages.
How Often Should Generators Be Tested?
Generators should typically be tested at least once a month. This frequency ensures they are in good working condition. Additionally, annual comprehensive tests are recommended to evaluate performance under load. Following the manufacturer’s guidelines can help maintain optimal functionality and prevent unexpected breakdowns.
What Tools Are Needed For Generator Testing?
Basic tools for generator testing include a multimeter and load bank. A multimeter helps check voltage, current, and frequency. A load bank is essential for testing the generator under a specific load. Other tools may include oil pressure gauges and temperature sensors to monitor performance accurately.
Can I Test My Generator Myself?
Yes, you can perform basic tests on your generator yourself. However, for comprehensive testing, it’s advisable to hire a professional. They have the expertise and equipment necessary for thorough assessments. Regular maintenance by professionals can ensure safety and longevity of your generator.
Conclusion
Generator testing is crucial for reliable performance. Following the steps ensures safety and efficiency. Regular testing can prevent unexpected failures. Always check fuel levels and battery status first. Monitor the output during testing. Record any unusual sounds or vibrations. Share findings with your maintenance team.
Keeping your generator in good shape protects your investment. Remember, a well-tested generator provides peace of mind. Make testing a routine part of your maintenance plan. Stay prepared and keep your power running smoothly.