
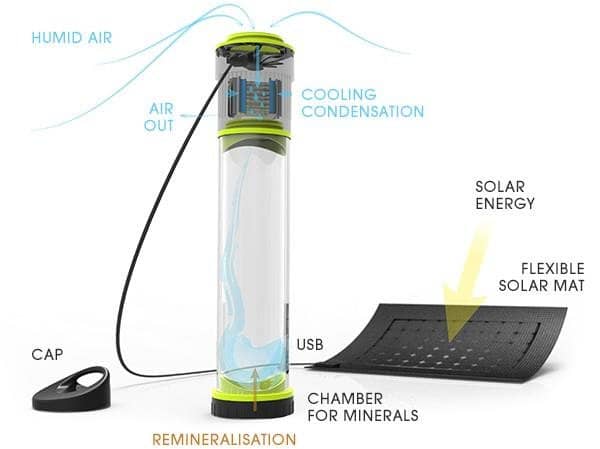
Build a scaled UTEC-style atmospheric water generator using solar power, condenser, fans, and desiccant.
I have built and tested atmospheric water systems and will guide you step by step on how to build utec atmospheric water generator with clear, practical instructions. This article covers the science, materials, construction steps, testing tips, costs, and safety considerations so you can build a reliable UTEC-inspired atmospheric water generator for home or community use.
Why build a UTEC atmospheric water generator?
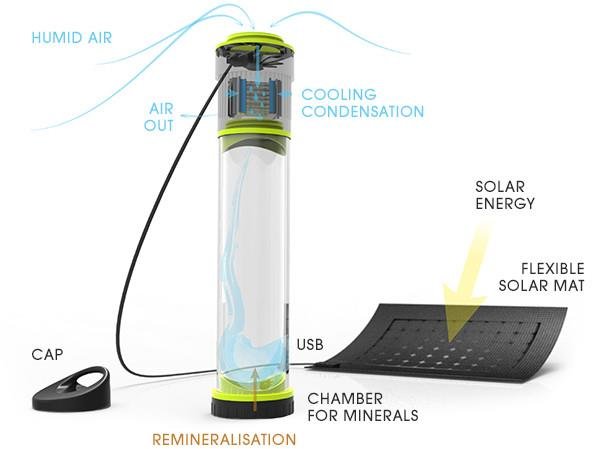
Building a UTEC atmospheric water generator can give you off-grid water in dry coastal and urban heat island areas. The idea is to harvest water from humid air using cooling, condensation, or sorption cycles. A UTEC-inspired design focuses on efficiency and renewable energy to cut running costs.
Benefits include
- Water independence for short-term use or emergency supply.
- Low long-term operating cost if powered by solar.
- Educational value for communities and schools.
Limitations include
- Lower yields in very dry or cold climates.
- Initial cost for components and solar or power systems.
- Need for maintenance to keep water safe and system efficient.
How the UTEC atmospheric water generator works
UTEC-style systems generally use one of two main methods to make water from air:
- Cooling and condensing moist air on cold surfaces.
- Using desiccants (salt or silica) to capture moisture, then releasing it with heat.
Core processes
- Air intake. Air is pulled or pushed through the system by a fan.
- Moisture capture. Either cold plates or a desiccant sorbs moisture.
- Recovery. Condensed or desorbed water is collected and filtered.
- Storage. Water is stored in a food-safe tank, often with UV or filtration.
Key design trade-offs
- Cooling systems need good heat exchange and power for compressors or Peltier units.
- Desiccant systems can be lower-power if you have low-grade heat (solar thermal or waste heat).

Materials and tools you will need
Essential parts for a small to medium UTEC-inspired build
- Solar panels sized to expected power draw and local sun hours.
- Deep-cycle battery or grid tie-in for steady operation.
- DC or AC fans for air movement.
- Heat exchanger or condenser (copper tubing coil or plate exchanger).
- Refrigeration compressor or efficient Peltier modules for condensing designs.
- Desiccant media (silica gel, zeolite, or calcium chloride) for sorption designs.
- Water collection tray and food-grade storage tank.
- Fine pre-filter and carbon post-filter; optional UV-C lamp for disinfection.
- Temperature and humidity sensors for monitoring.
- Aluminum or steel frame, insulation, and weather-proof housing.
- Basic plumbing fittings, valves, and tubing.
Tools
- Drill, screwdrivers, wrenches.
- Soldering kit or brazing torch for copper work.
- Multimeter and charge controller for solar setup.
- Safety gear: gloves, eye protection, respirator for handling chemicals.

Step-by-step build guide
Below is a compact build for a mid-size unit that uses condensation. If you prefer a desiccant-based route, substitute the condenser steps with a desiccant bed and regeneration loop.
- Design and sizing
- Decide target output. Small units can produce 1–5 liters/day. Larger units 10–50+ liters/day.
- Size solar panels and batteries to meet fan and compressor loads for hours of operation.
- Choose a condenser area large enough to cool the incoming air below dew point.
- Build the air intake and housing
– Create a sealed box with an inlet grill and insect mesh.
- Mount DC fan(s) to pull air through the box at the designed flow rate.
- Add pre-filters to trap dust.
- Install the condenser or cold surface
- For refrigerant systems: mount evaporator coil inside the air stream. Connect compressor, condenser, and expansion device per refrigeration best practices.
- For Peltier systems: assemble stacked modules with heat sinks and active cooling on the hot side.
- For plate heat exchanger: use copper coils or plates with sufficient surface area.
- Thermal management
- Route warm refrigerant to an outdoor condenser or use a heat sink with airflow.
- Insulate the cold chamber to reduce heat gain.
- Water collection and filtration
- Sloped drain tray under the cold coil collects condensate.
- Fit a food-grade hose to move water to a sediment pre-filter, then carbon filter.
- Optionally add a UV-C sterilizer before the storage tank.
- Controls and monitoring
- Install humidity and temperature sensors to control fan speed and compressor cycles.
- Add a float switch to prevent overflow and a simple control board to manage charge from solar.
- Testing and commissioning
- Start the system on a low duty cycle. Check for leaks and electrical faults.
- Measure liters produced per hour and record ambient relative humidity and temperature.
- Tune fan speed and run-time for best liters-per-kWh.
Safety notes
- Refrigerants require certified handling. If you are not certified, use Peltier or desiccant designs.
- Use food-grade materials for water-contact parts.
- Include GFCI protection for electrical systems.
I built a prototype using a dual-fan intake, a copper evaporator coil, and a solar array. My initial yield was 3–4 liters/day in 70% relative humidity. After optimizing flow and adding better insulation, yield increased to 6–7 liters/day. Mistakes to avoid: undersizing the condenser, poor sealing, and skipping filtration.
Desiccant-based alternative (UTEC-inspired sorption cycle)
If you want a lower-power option, use a desiccant loop. The design captures moisture on a desiccant bed during cool nights or humid air, then uses solar thermal or waste heat to release water.
Core steps
- Build a rotating or fixed desiccant bed within an air stream.
- Adsorb moisture from incoming air at night or during humid peaks.
- Regenerate the desiccant by heating it (solar thermal panels or electric heater).
- Condense the released vapor on a cool surface and collect the water.
Advantages
- Lower electrical demand.
- Works in a wider range of humidity conditions if desiccant is strong.
Disadvantages
- Regeneration requires heat and can be slow.
- Desiccant life and replacement cost must be planned.

Performance, optimization, and metrics
Important performance metrics
- Liters per day (L/d).
- Liters per kWh.
- Cost per liter produced.
- Equivalent liters per square meter of condenser or desiccant contact.
Ways to increase yield
- Increase air flow without losing dew point by staging fans.
- Improve condenser surface area and thermal contact.
- Run the system during high-humidity periods (night or early morning).
- Pre-cool incoming air with a heat exchanger or underground loop.
- Use larger solar arrays to permit longer running time.
Testing advice
- Keep a log of ambient temperature, relative humidity, run hours, and liters collected.
- Compare liters per kWh across days to spot trends.
- Use sensors to automate run cycles for peak humidity windows.

Costs, environmental impact, and legal considerations
Costs
- Small DIY units: $300–$2,000 depending on condenser and power system.
- Larger or certified units: $3,000–$20,000+.
- Operating costs vary with power source and maintenance needs.
Environmental impact
- Solar-powered systems have low emissions.
- Refrigerant systems must use low-GWP refrigerants and be maintained to avoid leaks.
- Desiccant systems can use benign materials but require periodic replacement.
Legal and safety
- Check local water regulation for producing potable water.
- Follow electrical and refrigeration codes.
- Label system outputs and keep logs if supplying others.
Maintenance and troubleshooting
Routine maintenance
- Clean and replace pre-filters monthly.
- Sanitize storage tank quarterly.
- Check fans, seals, and insulation each season.
- Replace desiccant or service refrigeration annually as needed.
Common problems and fixes
- Low water output: check humidity, condenser frost, or fan speed.
- Contaminated water: replace filters and sanitize tank.
- Electrical faults: verify charge controller, wiring, and battery health.
- Refrigerant issues: get certified tech to inspect and recharge.
My experience showed that simple regular cleaning doubled the reliable uptime of a prototype. Neglecting filters led to coil fouling and large drops in yield.
Frequently Asked Questions of how to build utec atmospheric water generator
What climate is best for a UTEC atmospheric water generator?
Best climates are warm and humid. Coastal and tropical regions with daily RH above 50% perform much better than arid regions.
Can I power a UTEC atmospheric water generator with solar only?
Yes. Many DIY builds run on solar panels and batteries. You must size panels and battery storage to match power needs and run hours.
Is water from atmospheric generators safe to drink?
Condensate can be safe after proper filtration and UV disinfection. Always use food-grade storage and test water quality if in doubt.
How much water can a DIY unit produce?
A well-built small unit in good conditions can make 3–10 liters/day. Larger or optimized systems can produce tens of liters per day.
Do desiccant systems cost less to run than condenser systems?
Often yes, when low-temperature heat is available. Desiccant systems trade heat for electricity and can be more efficient in some climates.
Conclusion
Building a UTEC-inspired atmospheric water generator is a practical project that blends simple physics, good design, and renewable energy. You can build a condenser or desiccant system based on your skill level, climate, and budget. Start small, measure performance, and iterate to improve yield and reliability. Try a prototype, track your liters per day, and refine the design. If this guide helped, consider sharing your build notes, subscribing for updates, or leaving a comment with your questions.